Streaming live content has become increasingly important for artists and performers, as a means to stay in touch with their audiences.
The most common streaming that has emerged on platforms like Facebook Live and Zoom is ‘Point and Shoot’. In other words, the majority of the streams are done very simply by logging into a streaming platform and pointing your smart phone at yourself.
In many cases this is fine. If you have a small audience and you are simply creating a live stream to reach out to friends, there is no need for a multi camera, audio rich presentation. In some ways, the rawness and honesty can be refreshing! That is, until it isn’t.
Some Interesting Findings
Recently, I spoke with a group of ‘creatives’ and asked them about their streaming. I was especially interested in how these people, who primarily worked for themselves as teachers, trainers and performers, were approaching this medium.
Strange times often create innovative solutions. The people I interviewed commented on the opportunities that streaming had exposed them to. Most had never streamed before. They all felt challenged and often disappointed with their early attempts. The most common complaints were that they:
Were frustrated with the technology
Struggled to get their message across
Found it hard to maintain engagement with their audience/students
Felt restricted with a single camera when teaching/performing
Were disappointed with the audio quality of the streams
A New World Order
It seems that EVERYONE is searching online for new ways to access creative activities. This could mean learning an instrument for the first time or finally starting the yoga classes that have been put off for years. In many instances, there are now people from around the world looking for online classes from a teacher that previously, they would have never dreamed of connecting with.
The group I spoke with could all see the potential in creating a quality stream and marketing themselves to this growing global market.
Why this article?
One of the great advantages in live streaming your content is that there is no post-production work required (unlike shooting a traditional video!).
I created four seperate streams with a variety of artists and performers over two days. I have included images and (short) recorded versions of these performances to encourage you to start streaming your own content.
Importantly, in all of the streams I have limited myself to inexpensive camera gear, lights and microphones. I have also provided some tips on the equipment and techniques we used during the sessions.
I did use a Roland VR-1HD streaming mixer to bring each of the streams together. It has a USB 3.0 output that plugs straight into your computer for streaming. We used both Facebook Live and Zoom as our streaming platforms.
Three (short) samples of live streaming using a vision mixer
A Few Tips to Get You Started Streaming Your Content
If you want to stand out from the crowd, there are a few things that you have to get right. Just remember, content is and always will be king! The trick is to offer something both informative and visually inspiring.
The following tips may help:
a. Well planned, bite-sized lessons / performances
Just like storytelling, your streams will benefit from having an introduction, a middle (the information) and an end.
People are time poor and they want to know what they will be doing/learning right from the beginning. It is a good idea to craft a short introduction that explains the objective of the performance or lesson.
The content of the stream should be something that the audience needs. That being said, you are the best judge of this. Always remember that you are speaking to people just like yourself. It’s important to showcase/highlight the things that you found difficult when you were learning. This makes you relatable, and it is often the difference between a good instructor and a poor one.
Maintaining engagement is probably the hardest difference between face-to-face performances and live streaming. It is almost impossible to read the audience and feed off their reactions. This is why a good plan is even more important when you are streaming.
In the case of lessons, the ending should be a quick summary of what you have just demonstrated. It should also have a short outline of the next stream to encourage people to come back.
Heidi's Art Class via Zoom
The equipment she used:
3 x cameras (2 handy cams & an iPhone)
1 x lapel mic
1 x laptop to access the streaming platform
Roland VR-1HD vision mixer to bring it all together
b. Entertainment – Yes, people must be entertained
It’s important to put yourself in your audience’s shoes. You have to get them excited about what you are going to be sharing! Enthusiasm, passion and authenticity are compelling qualities in a presenter.
Remember, we learn best when we are engaged. Challenge your audience to complete milestones. You want them to succeed and get the most out of your streams. Also, try to add humour where appropriate 🙂
c. Good lighting to set the mood
Some of the above suggestions are just that, suggestions. When it comes to lighting, things get a bit more instructive. Make sure you and your room are well lit. This is not optional. When streaming there are a few things that you can do yourself that will make a huge difference to the outcome. Lighting is one of them. Take the time to set the mood with your lighting.
There is an abundance of information online regarding the best way to light a room and a presenter. Typically, they focus on:
The 3-Point lighting technique for the presenter
Back lighting and ‘purposeful lighting’ for the room (includes lamps etc)
The effective use of natural light
Katijah & Jake - Streaming Dance Class
The equipment they used:
Natural Light and 2 x coloured spot lights
2 x cameras (1 iPhone with a hand held gimbal and a mirrorless camera on a homemade dolly)
1 VR-1HD vision mixer to bring it all together
Lighting yourself and the room don’t need to expensive. You can often use lights that you have around the home. The important thing here is to take the time to set the stage. This is one aspect of streaming that is often overlooked and also one of the easiest elements to improve.
d. Clear audio makes all the difference!
The audio quality of streams when only using a smartphone is often disappointing. One of the reasons for this is that most people position their phones in the best place for vision and not sound. This generally means that the phone is too far away from the voice, and the audio becomes very ‘roomy’. This is even more of an issue when music makes up an important part of your presentation.
There are a few considerations regarding audio. The best approach is to use an AV mixer (described below). With an AV mixer, you can run several microphones for your voice and instruments (if required) and also line inputs for recorded music or instruments with line outputs (such as keyboards).
The Rions - Live from their Garage
The equipment they used:
1 x Audio mixer (sent signal to VR-1HD)
3 x cameras (iPhone (gimbal), mirrorless camera (dolly) + Art Camera)
2x spot lights + 1 soft light
VR-1HD vision mixer
Good audio will probably improve the quality of your streams more anything else.
A side note: I highly recommend using a lapel microphone for your voice if you are simply speaking to the camera. They are very inexpensive, and they give you the freedom to move around without the need for a handheld microphone and/or stand.
e. Multiple cameras to shift the focus
People have been spoiled. It’s true. We have all seen too much TV with expensive sets and multiple camera angles. When we look at our streams, the first thing we notice is the lack of movement from the eye of the camera and the limited angles of vision.
We can create a ton of visual interest by adding a few viewpoints. This simply involves having a wide, main camera (or phone) focusing on the presenter and the room, another camera seeing the presenter from another angle and possibly a third camera focussing as either a close-up or an art camera.
Jessica Roemischer - Piano Stories
The equipment she used:
3 cameras (2 x handy cams and 1 x iPhone
Natural light
1 x Lapel microphone
VR-1HD Streaming mixer
1 x laptop to stream via USB
Another important technique with live streaming and video is moving the cameras while they are ‘shooting’. If you watch the cinematography on all movies you will see movement in almost every shot! There are a few inexpensive ways to achieve this below.
Note: Creating smooth movement while filming takes a bit of practice!
Creating Movement in Your Stream
A Homemade Dolly
Made from PVC Pipe (curved with ties) and skateboard wheels, a dolly captures smooth movement when rolled across the tracks.
Handheld iPhone Gimbal
A handheld gimbal allows you to follow the action and helps the audience to feel like they are in the room. Note: Move slowly to avoid seasickness!
Every stream will have its own specific needs. Often, in a three-camera setup, one of the cameras can be used as an ‘art’ camera. This can be used as a cut-away shot. For example, it may be the vision looking through a plant or candle, and is used to give the audience a moody outlook between the other more practical shots.
Examples of an Art Camera
On the topic of cameras, it isn’t necessary to have top end video or mirrorless cameras for your shoot. Most of the videos below have been shot using iPhones and inexpensive Sony handy cams (both have very respectable lenses). That being said, quality cameras with great lenses do make a big difference, but they are expensive!
The Overhead camera
One of the most useful shots to have in your stream is the ‘overhead’ camera. I have seen some crazy DIY articles on how to build the perfect overhead camera platform. I have also constructed a few myself!
Easy Tip: Use a light-weight camera.
If you are using a handy cam or a Smart Phone for your camera you can get away with using a microphone stand with a boom.
f. An AV Streaming Mixer to put it all together
As mentioned above, great audio and a multi-camera shoot will add a lot to the production quality of your streams. A vision mixer is what brings it all together. A vision mixer makes it easy to fade between the different cameras and it will also handle the audio ‘mix’ beautifully.
It’s like have a mini TV studio at your fingertips!
There are a lot of AV mixers on the market. It is important to find one that can handle different types of cameras, including smartphones. It is also useful if you can get one that has a USB 3.0 encoder built-in, as this will enable you to stream directly out of the AV mixer. Alternatively, you can buy an external encoder to translate the HDMI signal to USB 3.0.
For more information on typical streaming setups and the types of leads you will need, you should check out this article:
A few useful effects that you can use with a vision mixer
Split Screen Effect
Picture-in-Picture
Cross Fade Effect
Another important thing to look for is an onboard audio mixer. The quality of these will vary considerably between AV streaming mixers. I have selected four Roland AV switchers below and they all have excellent audio capabilities.
Your AV switcher will probably be the biggest expense when setting up a quality streaming solution. I can’t overstate the importance of including one in your plans. They are designed to be operated by a single person, are easy to use and very simple to learn.
Here are a few AV Streaming Mixers that are a great choice for creatives streaming from home.
The Roland V-02HD Streaming Bundle
(V-02HD + HDMI to USB 3.0 Converter)
The V-02 HD is a very compact, two-channel vision switcher. That means it will allow you to switch between two camera sources. You can also create a picture-in-picture (PnP) with either of your cameras. PnP is really useful for streams where you want to see both the presenter and something else (an instrument?) at the same time on the screen.
The V-02 also has a stereo audio input connector as well as two stereo audio inputs via the HDMI inputs (camera audio). There are eight audio effects including delay and reverb.
One of the big advantages of the V-02HD is that switching between channels can be handled by a foot switch. Nice!
The HDMI to USB 3.0 encoder that comes with the ‘V-02HD Streaming Bundle’, allows you to plug a USB 3.0 connector directly into your computer for streaming.
The V-02HD also has Remote Control software that allows you to operate the switcher via a tablet.
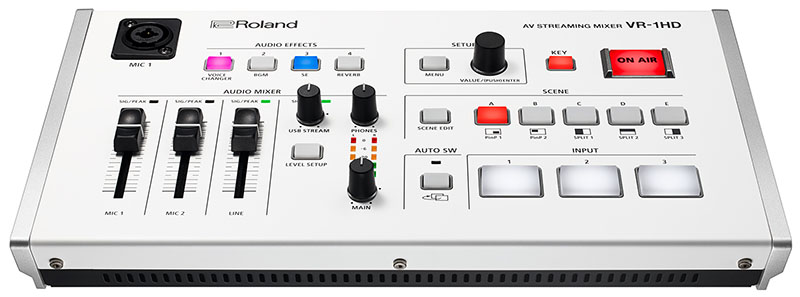
The VR Series of streaming vision mixers are very popular with creative streamers! The VR-1HD is compact and powerful and perfect for a single operator.
The VR-1HD handles three HDMI sources (cameras, iPhones, tablets, computers etc) and has a simple user interface. This is truly a plug-and-play device, because it has scalers on all of the inputs so it can handle whatever you throw at it.
The vision effects include multiple transitions, Picture-in-picture (PnP) and keying (for logos). With the VR-1HD you can setup ‘scenes’, which are composites of your favourite screen presentations. This may include a PnP of you speaking in the bottom right corner, while the main video is focused on an instrument you are playing.
As far as the audio goes, the VR-1HD really has you covered! It has two balanced XLR microphone inputs with phantom power. It also has a stereo line input and stereo line output. The audio mixer is part of the interface, which makes it intuitive to operate. There are also a host of audio effects to give you professional sounding audio every time.
The VR-1HD has an inbuilt HDMI to USB 3.0 encoder so you can stream directly from the unit. This is the ideal streaming solution for most creatives who want to take their streaming to the next level.
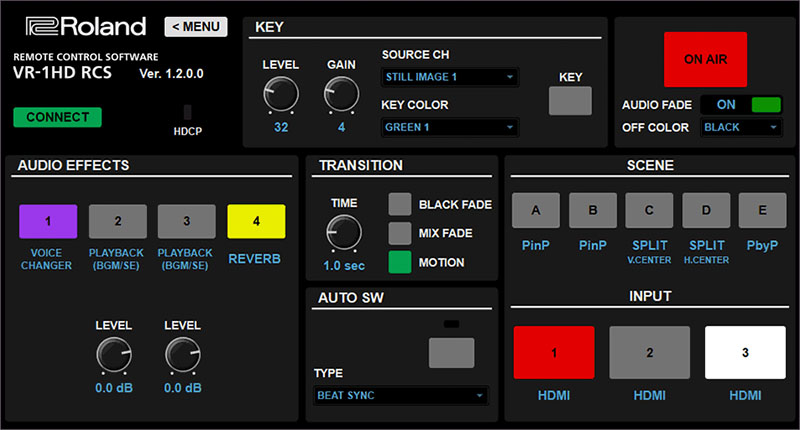
The VR-1HD also has Remote Control software that allows you to operate the switcher via a tablet.
Remote Control Software (RCS) for the VR-1HD Streaming Mixer
The Roland V-1HD Streaming Bundle
(V-1HD + HDMI to USB 3.0 Converter)
The V-1HD is a four-channel vision mixer. This means that it can switch between four HDMI sources (camera, iPhone, tablet, computer etc.). It is a compact unit and comes with a T-Bar which is excellent for creating slow transitions between your shots.
This switcher is ideal for creatives that want to introduce images via a computer or a keyed logo to help promote their brand. As far as vision effects, it has multiple transitions, Picture-in-Picture (PnP), split screens and keying effects. The V-1HD only has one scaler (channel 4) so you have to be careful to match your sources.
The audio section of the V-1HD includes four stereo audio inputs from the HDMI ports and a stereo line level input and a mic level input. That makes 12 audio channels all together! There are heaps of audio effects like delay, reverb, eq and compression on every channel.
The HDMI to USB 3.0 encoder that comes with the ‘V-1HD Streaming Bundle’, allows you to plug a USB 3.0 connector directly into your computer for streaming.
The V-1HD also has Remote Control software that allows you to operate the switcher via a tablet.
I hope this article has given you some ideas about how to stream your content. There are so many opportunities for artists and performers to share their work and connect with a global audience.
An interesting finding that came out of this project was that our streams on Zoom had slightly better quality than our Facebook Live streams, but the audiences were smaller due to the complexities of logging in. Our Facebook Live streams had significantly more people attending and everyone said the sound and vision were fine! This maybe something to consider for your projects.