The BOSS Acoustic Singer series of amplifiers is designed for the guitarist/vocalist who needs one self-contained unit for handling all of their amplification needs; acoustic guitar, vocals, maybe even effects and backing tracks. The idea is that you can rock up for a gig with your amp in one hand and your guitar case in the other hand have pretty much everything you need to perform.

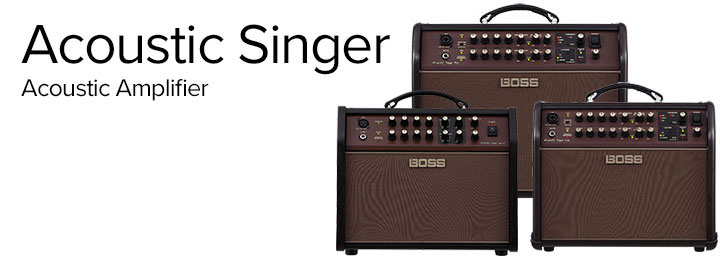
There are three amps in the series: ACS Pro, ACS Live, and the new ACS Live LT.

The ACS Pro sits at the top of the range, with a 100W woofer and 20W tweeter affording you the power to provide stage volume and play to bigger crowds.

Next is the ACS Live with a 50W woofer and 10W tweeter – perfect for those small to medium-sized gigs.

Both of these amps feature a variety of stage- and recording-ready features, as well as some extra tools to take your creativity to the next level like in-built looper and intelligent vocal harmoniser! They also include a two-button footswitch so that you’re gig-ready right off the bat.

The baby of the range is the Acoustic Singer Live LT, a more streamlined model for players who don’t need the looper and harmony features. There are still two channels for connecting an acoustic/electric guitar and a vocal mic, plus dedicated EQ and effects for independent sound shaping.

Let’s talk through how to set up your Acoustic Singer amp and get ready to play.

Contributed by Peter Hodgson for the Roland Australia Blog

Setting Up

First you’ll want to set your input levels. First turn your master volume and the two channel volumes (Guitar and Mic) all the way down so you don’t get any nasty high-volume thuds or squeals.

Plug in your instruments (and the foot controllers if you have them), power the amp on and adjust your inputs. Turn the master volume up a little then set each channel volume so that the loudest sounds fall just short of distorting. It’s always a good idea to make sure you don’t turn your amp on until everything is plugged in.

Using Acoustic Resonance

The Acoustic Resonance control adds some depth and body to your acoustic guitar sound, and is activated by a button between the amp’s guitar input jack and volume control. It has three different voicings represented by green, orange and red LEDs so if the first isn’t to your liking, just press the button again until you find one you like. You may even find that different settings work best for different songs with the same guitar.

Using Anti-Feedback

The Acoustic Singer’s Anti-Feedback section includes a Phase switch and an Anti-Feedback control. Hit the Phase first, and if that doesn’t zap your feedback woes straight away then try the Anti-Feedback knob, but take it easy: you only need to turn it up to the point where the feedback goes away. If you turn it up too far your sound will lose some clarity and depth.

Using Guitar Effects

The Acoustic Singer has two types of Chorus effect, each controlled by a single knob. Just turn from left to right to select between the more subtle Type 1 and the richer, more hi-fi-sounding Type 2. The further to the right you turn the control, the stronger the effect will be. There’s also a Reverb control which gives you a clear, breathy reverb texture that you can set from subtle to ‘whoa that’s a lot of reverb.’

Using Mic Effects

The Mic channel has two ambient effects sections: Delay/Echo and Reverb. Delay gives you a nice, clearly-reproduced repeat of the input signal, while Echo is a more natural echo repeat sound with reduced treble. Which one you choose depends on the song and the sound of your voice: sometimes a vocalist with a thinner-sounding voice can really benefit from some subtle Echo as opposed to Delay. The Reverb control is separate to the Delay/Echo control and it’ll give you an airy spatial effect. Try experimenting not only with different Delay/Echo and Reverb levels on your Mic channel, but also with different Reverb settings between your Mic and Guitar channels. A Guitar channel that is heavy in Chorus and Reverb may sound better with only minimal Mic Reverb, for instance, or vice versa. But there are no rules and it’s all down to what sounds best for you and your music. You can turn Delay/Echo and Reverb on and off with the footswitch.

Using The Harmony Feature

The Harmony section on the Mic channel lets you select between three different Harmony types – High, Unison and Low – which are pretty self-explanatory, but if you’re new to vocal harmonies it’s as simple as this: High will take your voice and create a second voice singing a note higher than the original note. Low will create a lower note, and Unison will create the effect of two identical voices singing nearly the same, which is a common recording studio trick to get more air and vibrance out of a voice. The Acoustic Singer can listen to your guitar playing and automatically create vocal harmonies based on the chords you’re playing. You can activate harmonies with the footswitch.

Using The Looper Feature

The Looper section (only for ACS Live and Pro) is exclusive to the Guitar channel, and allows you to record and play back layers of guitar parts to create complex backings. You can use an FS-6 foot switch to record and replay your loops.

Using The Tweeter Attenuator/Mute

The Tweeter is the small but powerful speaker responsible for the high-end (treble) content of the sound. If you find that your tone is a little too bright for the room you’re playing in or if you’re hired to provide more of a background ambience than a ‘hey look at me!’ performance, you can easily turn the Tweeter off with the switch next to the Master Volume. This section of the controls also includes a Mute button which is replicated on the matching footswitch so you can easily cut your sound off when needed. Like if a drunken Best Man grabs your guitar and starts singing ‘More Than Words’ at the wedding reception you’re playing.
Here’s a more in-depth demonstration of the Acoustic Singer Pro and Live with our own Josh Munday:

Related Products

Scroll to Top

SIGN UP TO DOWNLOAD
THIS TD-50 CUSTOM PATCHES

Created by Roland V-Drums specialist Simon Ayton, these patches were designed using the internal factory sounds and many of the techniques covered in the TD-50 guide. Enjoy exploring the possibilities!