How to set up your GO:LIVECAST and stream using two different camera shots!
It’s easy to stream live with your smartphone, but making your livestreams look professional needs a bit of “something extra”. That’s why you need the GO:LIVECAST! It’s a simple and affordable way to give you great quality production to your webcasting. This combination of hardware and smart device app is a streaming studio that lets you mix sound, display titles, play media, trigger sound effects, and more—without needing a computer or expensive gear.
With just the GO:LIVECAST, the companion app and your smartphone, you have all the tools you need to present engaging live web shows that will rival the most advanced creators on social media. In this guide I will show you how to use the Roland GO:LIVECAST for the first time. I’ll show you how to register the GO:LIVECAST and the different ways to set up and connect your mobile device. I’ll also show you how to set it up to use two smart devices so you can switch from one view to the next, for super pro results!
Contributed by Mark Watson for Roland Corporation Australia
Table of Contents
Registering your GO:LIVECAST
The first thing you’ll need to do is register your GO:LIVECAST with Roland. After registration, you’ll get access to Roland’s product support, an extended warranty, and training videos and other information. Follow these steps to register and then continue to setup
- Log in to your Roland Backstage account. If you don’t have one yet, you can create one here. Roland will then send an account activation email to the registered email address to complete the account creation process.
- On your account home page, click My Gear, and select Register a Product.
- Fill out the information and include the serial number located on the bottom of the GO:LIVECAST and click Register. You will need to enter the purchase date, method, and the Dealer you bought it from as well.
Downloading the GO:LIVECAST app
The GO:LIVECAST and its app are compatible on iOS and Android devices. For them to work correctly, you will need to download the app. You’ll use the app to stream, record, and edit your videos. The app also has multiple choices for the cool options available by pressing the front panel buttons! Just go to the App Store (iOS) or Google Play Store and download the latest version.
IMPORTANT! Please visit the Roland website to check on compatibility with your device! GO:LIVECAST Smartphone Compatibility
How to setup your GO:LIVECAST
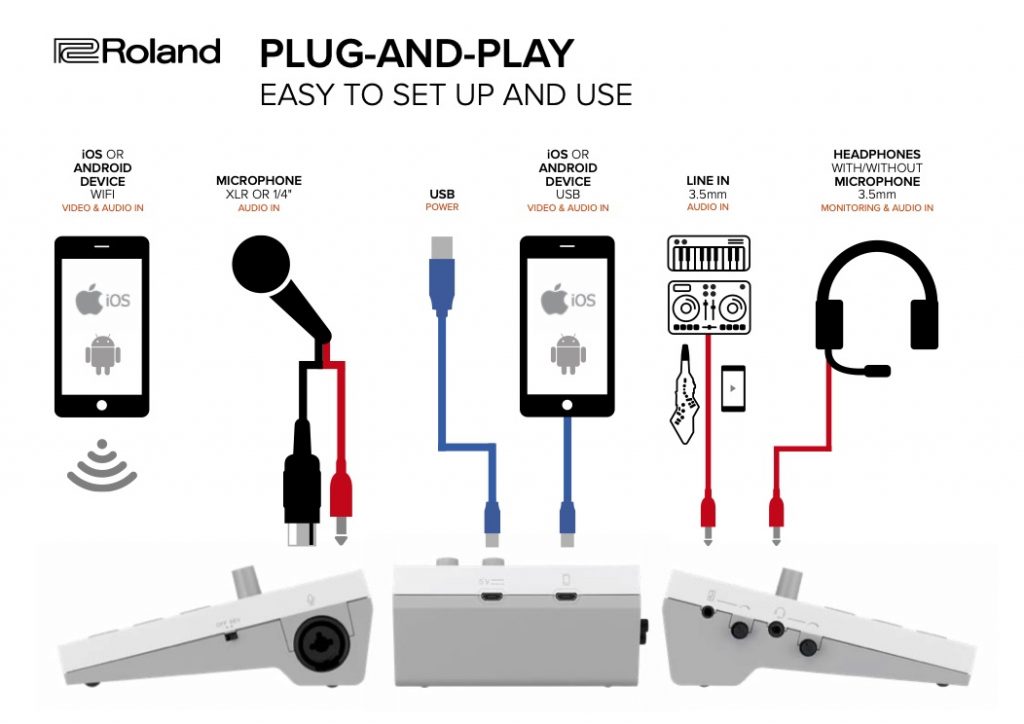
Before you launch the app on your smart device, you will first need to get your GO:LIVECAST set up. The connections are straightforward. Just make sure that the volume is turned down when you do connect something to the GO:LIVECAST.
- Audio that goes through the LINE IN jack is MONO.
If a headset with a microphone is connected the GO:LIVECAST’s internal microphone is disabled.
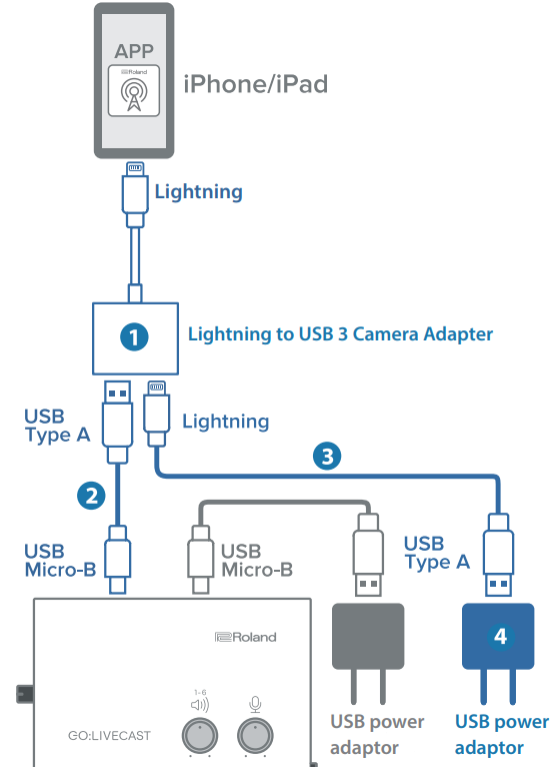
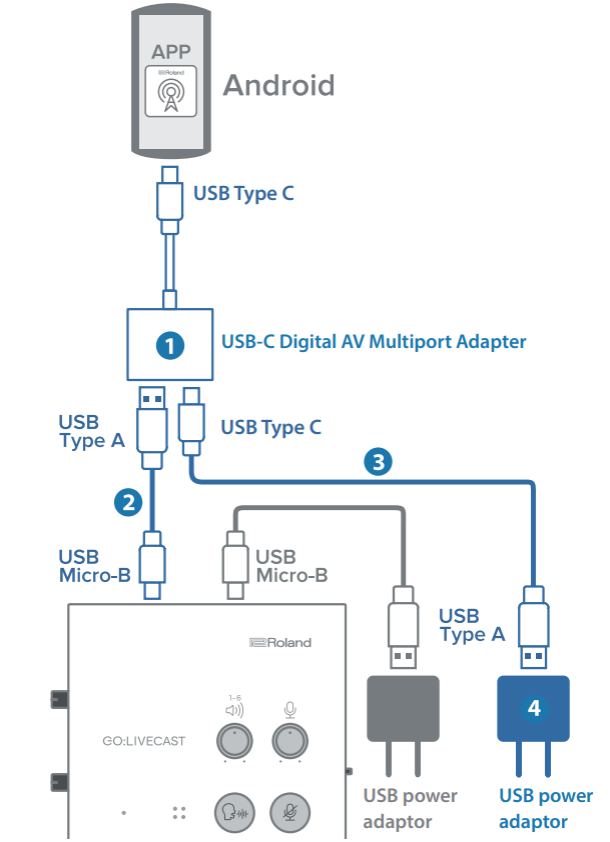
Supplying power to your GO:LIVECAST
If you want to supply power to your mobile device while using the GO:LIVECAST, you must use the following cables and adapters for your specific device:
iOS
- Apple Lightning to USB 3 Camera Adapter
- Lightning to USB cable
- USB to Micro USB cable
- USB power adapter or USB power bank
Android
- Apple USB-C Digital AV Multiport Adapter
- USB to Micro USB cable
- USB-C to USB-A cable
- USB power adapter or USB power bank
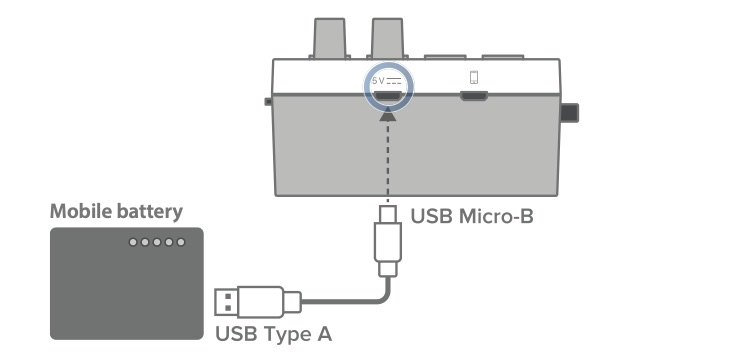
Outdoor Use
When using the unit outdoor, you can supply power from a mobile battery (sold separately) instead of an AC outlet. This makes it really handy for creating content on the go! The GO:LIVECAST is so compact!
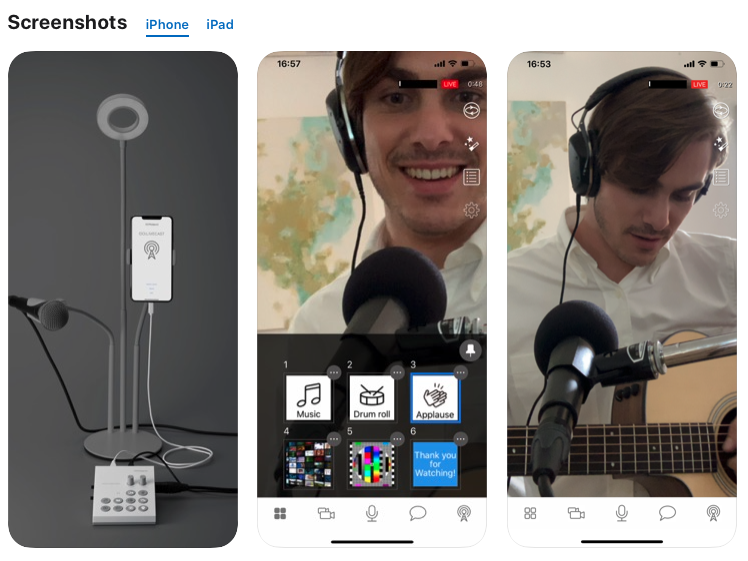
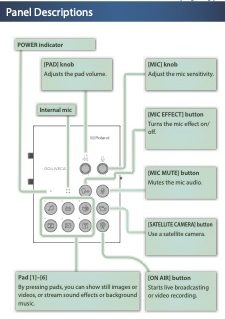
The Front Panel
The front panel of the GO:LIVECAST is well laid out and intuitive.
By pressing buttons 1 through 6, you can show images or videos, or stream sound effects or background music. There’s a knob for the volume of these sound buttons as well as one for adjusting your microphone volume.
Last but not least, there’s a button for going live “ON AIR” as well as a button for switching between cameras.
Making your first GO:LIVECAST livestream
Once you’ve got everything connected, it’s time to start your livestream. After you’ve launched the app, you’ll need to choose the platform you’re going to stream to, and depending on our setup, you may want to adjust some settings, as well.
TIP: If you’re getting feedback or if you’re streaming in a large room or outdoors, press the Mic icon on the app to turn down the reverb. Alternatively, you can press the Mic Effect pad to turn the reverb off completely.
- Talk into the microphone and adjust the input level so it’s loud enough but it won’t distort.
- Press the Cog (Settings) icon on your mobile device to open the Settings menu and adjust the following settings, if necessary:
- Streaming Volume: Adjusts the stream’s master output
- In Camera Mirroring
- Monitor buffer size: If you have a mobile device with low specifications, raise the buffer size to reduce the risk of dropouts or static.
- Press the On Air (antenna) icon on the app, select your streaming platform, and enter your login credentials.
- Visit the user manual for detailed setup instructions for your streaming platform.
- Press the On Air pad on your GO:LIVECAST to begin streaming.
Recording your videos
There may be a time where you just want to record a video and wait until later to publish it to your social media account. Doing a quick test recording is also a really good way to fine tune your settings before starting a livestream! All you need to do is press the Settings icon and enable Record Mode.
Streaming or Recording Content
Satellite camera setup
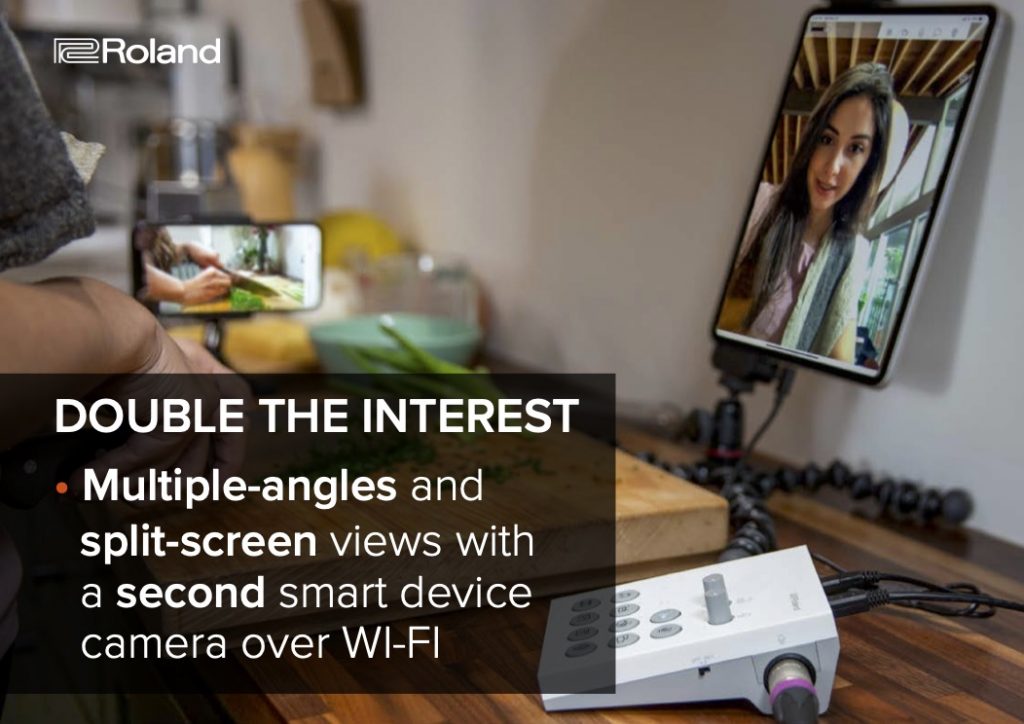
If you have multiple compatible iOS or Android devices, you can sync them together through the app. This is a great feature if, for example, you want to switch camera angles or have a picture in picture livestream. Follow these steps to set up a satellite camera.
IMPORTANT: The app must be installed on both devices, and they must be on the same Wi-Fi network to work correctly.
- On your main mobile device, launch the app and press Satellite Camera. A screen will appear that displays the satellite camera settings.
- On the satellite mobile device, launch the app and press Satellite Camera to begin the pairing process.
- When the devices have been successfully paired, the name of the satellite mobile device will appear in the grey box on the main mobile device.
Streaming Two Cameras (Satellite Camera)
A Mini Broadcast Studio at Your Fingertips
Via a simple, customizable control layout, the GO:LIVECAST hardware lets you direct your live presentations and stay fully engaged with your audience. All it takes is a touch to start broadcasting, play music, display titles, launch photos and videos—or even trigger some applause at the end of the show! Knobs provide quick control of mic and media volumes, while the mic-mute button will keep coughs and unwanted sounds out of your livestream.
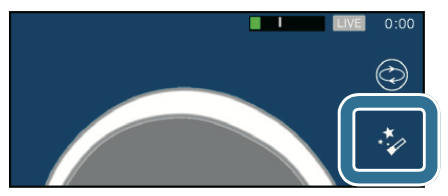
Get the Best Out of Your Smartphone Camera
Select your smartphone’s front or rear camera within the app and add a skin filter, if needed, to soften the look. When you use the filter, your face is softened in appearance. Simply tap the “magic wand” icon and the filter will enhance your face. To turn it off, tap the magic wand icon and it will return to normal.
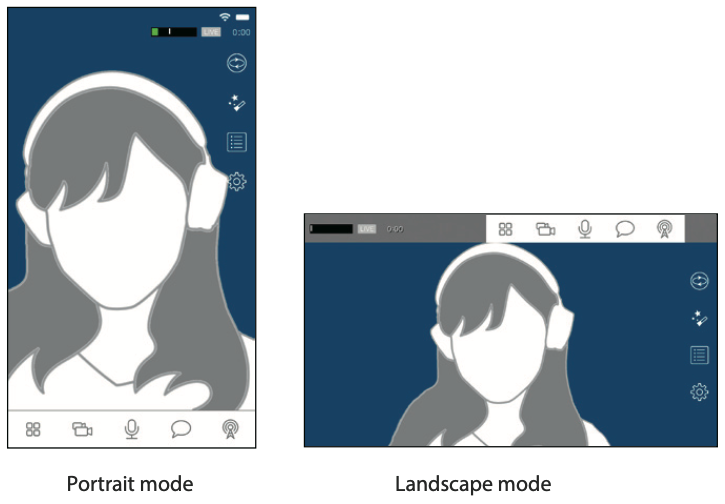
Portrait or landscape mode
Portrait or landscape mode is automatically set by your phone’s positioning, while in-camera mirroring displays the proper left/right perspective to your audience. This is handy if you have different platforms that you stream on, and want to present in a different view!
Streaming the Smartphone's Screen (Game Streaming Function)
Also, version 1.10* of the GO:LIVECAST app supports streaming sound and images from a second phone via its screen record function. This allows gamers playing games or music app performances to be streamed live from the second phone while overlaying picture-in-picture from its front-facing camera.
*The Version 1.10 update is not supported on some mobile devices. Visit the Support tab for the latest compatibility information. GO:LIVECAST Smartphone Compatibility