Read this article to find out how to trigger loops and WAV samples from v-drums.
Add samples to your favourite V-Drums kit and get more out of your drum setup.
Contributed by Simon Ayton for Roland Australia Blog
V-Drums Kits are hugely versatile.Even the entry level TD-1 contains 15 different drum kits to cover a wide range of musical styles.
The popular TD-25 features 36 kits and many freely assignable and editable sounds!
However, sometimes you need a specific sound that isn’t available on your kit. Luckily sampled sounds are simply a connection away.
Read more about preparing WAV samples for triggering here
Laptop drum sampling software is readily available and great for studio applications but such a fragile setup brings its own problems when performing live. Audio glitches and crashes are all too common when trying to run a sample library at low latency.
The SPD-SX and TM-2 sample players are elegant solutions to these problems.
When connected to a V-Drums kit, each time you hit a pad or cymbal, this MIDI note will be sent out of the MIDI out to the MIDI in of the TM-2 or even SPD-SX to trigger the sound assigned to that note.
Simply choose sounds for your triggers/pads in your MIDI slave unit (TM-2 or SPD-SX) then assign MIDI notes to them for endless new sound layering possibilities for your V-Drums.
Here we’ll look at adding samples to the TD-25 series but the same procedure can be used for other old and new kits in the V-Drums range.
Setup Steps:
Connections:
1. Connect the MIDI out of your V-Drums kit (the master) to the MIDI in of the TM-2 or SPD-SX (the slave).
2. Connect the Stereo out of the TM-2 or SPD-SX to the MIX-in of the v-drums to hear them combined.
Settings:
For the TD-25 V-Drums
1. Choose any patch on the V-Drums kit
2. Make sure the MIDI channel is set to 10 in the TD-25 MIDI Settings
In the MIDI Pad Note Number settings of the TD-25, you will see which pads trigger which MIDI notes. Stick with the default settings and it will work fine but you can change these should you want to customise your setup in the future.


TM-2 Trigger Module
4 unique samples can be triggered from the TM-2 remotely via MIDI. One for each of the trigger inputs Trig in 1&2, 3&4. Use these steps to setup the TM-2 to trigger via MIDI notes
1. Press INST
2. Press the right arrow button to get to the NOTE# screen
3. Press the [SHIFT] 1 & 2 buttons to choose the trigger 1H, 1R, 2H, 2R
4. Press + – buttons to choose the MIDI note from 0-127.
Holding [SHIFT] lets you jump in multiples of 10’s instead of 1’s. Here are some typical note assignments you could use.

SPD-SX-Sampling Pad
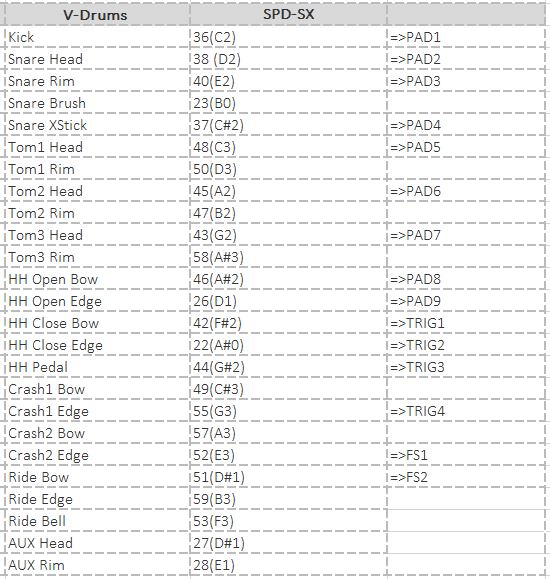
Taking it further, 15 unique samples can be triggered from the SPD-SX remotely via MIDI. One for each of the following SPD-SX pads 1-9, trig in 1&2, 3&4, footswitch x2
1. Press MENU-KIT-MIDI
2. Choose which pads to trigger remotely from the V-Drums using the cursor keys or by simply hitting them then choosing a MIDI note for that pad.
3. Each pad can have it’s own MIDI note to correspond to the V-Drums pad being played so simply choose a MIDI note for each pad on the SPD-SX.
Here are the note numbers for the TD-25 V-Drums kit and possible SPD-SX note assignments:


