SP-404MKII v2.00 New Features, Tips and Tricks
Please refer to the latest manual for complete list of new features.

The SP-404MKII is the ultimate SP sampler and now with version 2.0 you have even more amazing features. There’s deeper control of melodic and harmonic programming with Chromatic Mode recording plus polyphony and scale setting. A TR-REC style (which is like programming beats on an 808 drum machine) step sequencer for classic programming for easy beat programming of dance music and modern hip-hop.
The enhanced DJ Mode gives new performance techniques, now allowing you to mix between SP patterns as well as audio files. Create movement in your production with Motion recording for intricate control of sub step, pitch, and velocity parameters and Skip Back Sampling has been increased from 25 seconds to 40 seconds.
We’ve also brought back our legendary VariPhrase algorithm, so you can stretch a sample’s pitch and time with superior sound quality and less audio degradation. Then enhance your grooves with new MFX including Cloud Delay, SX Delay, SX Reverb, and Backspin. Plus, new input Harmony Effects will expand performance possibilities for vocalists and instrumentalists.
In this article we’re going to dive into how to quickly access some of these cool features.
CHROMATIC MODE
In Chromatic Mode you can now play back samples and change their pitch as a chromatic scale with the pads.
- In the standard Playback Mode choose a sound by pressing pads [1]-[16] to select the sample to use in chromatic mode
- Press Shift and Pad 4 to go into the Chromatic mode.
- Now play the sound chromatically over the pads.
- Press the Remain button and choose from Legato mode or Poly mode.
In Legato mode, when you press a second pad, the sample will continue to play, but it will change in pitch to the pitch of the new pad you have pressed.
- Press Remain again and you get Poly
In Poly mode, you can play multiple pads at the same time with a maximum polyphony of 32 voices. This gives you a lot of creative flexibility in creating chords with your samples.
- Change the scale by pushing in the Value knob.
This means that the pads will only play the notes in that scale, very useful for staying in key.
Remember you can toggle between RECORDING and REHEARSAL mode by pressing [REC] to play around and preview ideas before you commit them to the PATTERN.
I recommend experimenting with GATE on/off for your samples to experience different types of behavior, both for live PAD playing, and REAL-TIME or TR-REC recording modes.
- Select the musical scale displayed on the PADs by pressing down the VALUE
You can also use ERASE MODE ([DEL]) to remove specific recorded note values during CHROMATIC MODE recording, the same way you would use ([DEL]) to remove specific pads during REAL-TIME recording. To watch this in action check out this video.
TR-REC Mode
The SP-404MKII now has a step sequencer!
This now exists alongside the REAL TIME pattern recording and lets you enter sounds into your patterns by selecting individual steps on the sequencer.
Both modes can be used to edit patterns, so you can choose which mode you want to use depending on the tools that you need at that time.
To use the TR-REC sequencer,
- Enter the Pattern Select
- Press Record to record a new pattern.
- Choose an empty pad to record to.
- Look at the Recording Settings screen.
- Change the BPM using Control knob 1.
- Change the length of the pattern by using Control knob 2. (up to 64 bars.)
If you’re working with more than one bar, turn the Value knob to move between your bars.
You can also change the shuffle amount by using Control knob 3.
- Hold down the Shift button for a second menu where you can change the time signature.
- Use Control knob 3 to change the metronome volume.
- At the bottom of the display it says Real Time.
- Press the Remain button and it will change the mode to TR-REC
- Press Record again and you’re ready to record a pattern.
You should now be in the TR-REC step editor. This is confirmed by the indicator light flashing across all pad steps.
To choose a sound, press the Sub Pad.
This will open up the sound banks and you can choose a sound.
Choose a sound and then let go of the Sub Pad to enter the steps into your 16-step sequence.
You can also change the velocity of your hit using C3 and enter these into the pattern.
Press the Sub Pad.
Choose an open hat and add some hats into your pattern.
Now do the same for the claps.
Now add some extra percussion. You will notice there’s a menu item called Substep.
Control this by using Control knob 1 and you will see there is a lot of different Substep variations which range from double and triple hits to sample offsets and more.
With these settings you can now add rhythmic variations into your patterns on certain hits.
Try changing the Substep to a slightly offbeat timing and add a hit on step 12 then change it to default timing and add a hit on step 15. To watch this in action check out this video.
MOTION Recording
You can now Motion Record certain values into the TR-REC mode. This is very similar to using automation in your DAW or recording software. You can record knob movements assigned to volume for example. Here’s how to do it.
- Press Sub Pad and choose hi-hat and then add it on every step of the sequence.
- Now hold down Roll and turn the C3 knob. This will motion record the volume across the hi-hat hits as in the video.
- You can also motion record for Substeps and Pitch as well.
How to record a pitch variation.
- Press the SUB PAD to choose a new sample.
- It is now also possible to change the pitch of samples for each step by using the C2 knob.
- Push in the Value knob and turn to change the root key of the scale.
Watch this video to see it in action.
PATTERN SEQUENCER
Another feature that has been added in the new update is the ability to record a sample chromatically into patterns.
- Press REC again to enter Rehearsal mode and choose a sample.
- Select a chord by pressing one of the pads.
- Then press SHIFT and Pad 4 to enter CHROMATIC MODE.
- Now play the sample over the pads melodically.
- When you are ready to record, press REC again and enter the notes into your pattern.
To watch this in action check out this video.
SOUND ENGINE
In the Pitch/Speed menu, there are now new time-stretching algorithms.
These have been based on Roland’s legendary VariPhrase algorithm.
So you can now stretch a sample’s pitch and time with superior sound quality and less audio degradation.
- Press SHIFT and then turn the Value knob to select a different algorithm.
- Select Backing for instruments with a sharp attack such as drums.
- Select Ensemble for sustain-type instruments such as bass or pads.
CHANGE PARAMETERS OF MULTIPLE SAMPLES
It’s now possible to change the values of multiple sounds at the same time.
- Press Shift and Pad 8 to add all of the sounds you want to change to a mute group.
- Select the sounds by pressing the corresponding pads.
- Press the PITCH/SPEED button, hold the COPY button, your mute group pads will flash.
- Change any of the control knobs and those settings will be changed across all the sounds in your mute group.
You can also use this technique to change the volume, the BPM value, BPM Sync, Gate, Loop, or Reverse of multiple sounds at one time.
EFFECTS
There are four new MFX in the version 2 firmware update.
- Press MFX and Isolator and then press pads 1 through to 4.
- Pad 1 is SX Reverb.
- Pad 2 is SX Delay.
- Pad 3 is Cloud Delay.
- Pad 4 is Backspin.
There is also the option to change the Reverse style to the older yet still iconic version from the SP-303.
- Hold down SHIFT and press Pad 13 for UTILITY
- Select SYSTEM by pressing down the ENTER
- You will see the GENERAL
- Scroll down to Reverse Type.
- Push ENTER and scroll to 303 and push the ENTER knob again.
- Press EXIT twice
With the 303 Reverse mode on, the Reverse button will trigger an immediate reverse continuing from the current playback point.
A new Harmony effect added to the input effects.
This means you can add this to your signal whilst recording.
- Press Shift and External Source go to the Input Settings.
- Push in the Value knob.
- Choose the Harmony effect from the menu.
With this effect, you can change the pitch and formant of your voice, as well as adding extra voices at pitched values in the key of your choice.
SNAP TO ZERO CROSSING
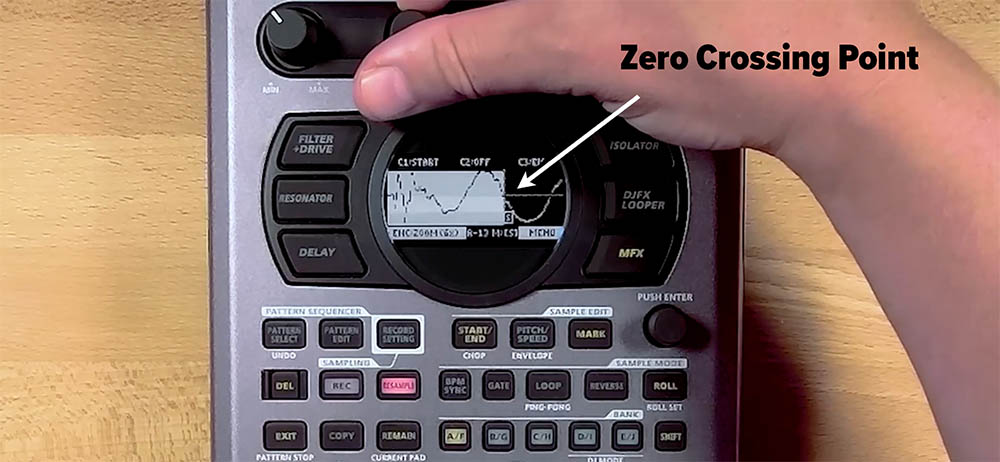
Now, when editing samples using the Start/End screen, you can snap to the zero crossing points of the wave by pressing the Resample button. This helps you to eliminate pops and clicks when trimming your samples.
SKIP BACK
The Skipback function on the SP-404MkII is always listening and you can recall the last bit of audio of whatever your last performance was! You can jam out and then grab your best take!
It used to be 25 seconds but now you can recall up to 40 seconds of Skipback audio.
- Go to Utility menu by pressing Shift and Pad 13.
- Choose System
- Select General
- Change SBS Time to “Long”.
DJ MODE
You are now able to “DJ” using your internal PATTERNS with Channel 1 and Channel 2 along side each other in DJ MODE!
- Get into DJ mode by pressing Bank D and J
- Load a WAV track into Channel 1 by pressing the Value knob and choose “CH 1 select”.
- Start playing the drum loop. Turn CTRL 1 for volume.
- Press Pattern Select and choose the pattern that we would like to mix, then when you press Pattern Select again, that pattern will be loaded for you to play.
- If you would like to go back to your WAV tracks, just press Pattern Edit.
- You can now see a new display in DJ MODE dedicated to the PATTERN You can Play, Sync, and Cue just as you would with a track on CH1/2.
- Toggle between this view and CH1/2 view by pressing PATTERN EDIT.
Note that the PATTERN playback will sync to whichever channel is set to M (Master). Be sure to watch which Channel is dictating the BPM when moving through tracks and PATTERNS.
Another new feature of DJ mode is if you press the Start/End button, you can now use the C3 knob as a cross-fader to mix out your tracks perfectly.
The Quick Loop function added to DJ mode.
- Hold down the Roll button and press Pad 13 for CH 1 or Pad 15 for CH 2.
- Press Roll again to change the speed of the loop by pressing Pads 1-4.
- Press and hold Roll again to change the speed of the loop by pressing Pads 1-4.
UNDO
In the new update, the undo steps have now been increased from 8 to 16, twice the amount of Undo. If you add something by accident, it’s very easy to remove.
- Press SHIFT and PATTERN SELECT as many times you want to undo.
STOP ALL SAMPLES
On previous firmware to stop all sounds playing on the SP, you would press the Exit button four times.
This function can now also be accessed by using the quick command of Shift and Exit.
For any additional information, as always, please visit the SP-404MKII page on the Roland.com website.
