The Ultimate Guide to the TR-8S Rhythm Performer – Load Your Own Samples

TR-8S Ultimate Guide

Another powerful feature of the Roland TR-8S is the ability to load your own samples, and incorporate them into your Kits. Of course this completely changes the game for many, meaning that all the performance-oriented controls of the TR-8S can be applied to virtually any sound you can think of.

Samples are loaded via SD Card, formatted on the TR-8S, and readable on your computer.

Recognized File Formats are WAV and AIFF. Maximum length of a single audio file is 180 seconds, for a 44.1KHz mono file.

The file directory created when the SD Card is formatted by the TR-8S Is:

Roland/TR-8S/SAMPLE

Roland/TR-8S/SAMPLE


This folder structure must be maintained in order for the TR-8S to find your samples. With the SD Card mounted on your computer’s desktop, load your samples into the folder called SAMPLE. You can copy a folder of your samples, or individual files into the SAMPLE folder. Any sub-folders you place inside your folder will not be recognized by the TR-8S.

The display of the TR-8S has 16 Characters, so you may want to come up with a File-Naming Method that helps you choose and work with samples more easily, once they’re loaded into
the TR-8S.

User Samples in the TR-8S appear under the IMPORT Category, before all of the Instrument Categories of the factory preset library that ships with the TR.

Contributed by Alexander Marlowe for Roland Corporation Australia

Loading Samples into the TR-8S

  1. Insert your SD Card into the TR-8S card slot at the back of the Unit.
  2. Press the Utility Button.
  3. Hold Shift and turn the Value Knob to select SAMPLE: Import, then press Enter.
  4. Turn the Value Knob to select File or Folder and press Enter.
  5. Turn the Value Knob to select the File or Folder you want to load and press Enter.
  6. The Display shows ‘Import?’ To cancel the load operation press Enter.
  7. To load the File or Folder turn the Value Knob to select OK and press Enter.
  8. The Display shows ‘Executing’ and a progress bar while the Sample loads.

Adding Samples to a Kit

  1. Press an Instrument Select Button to choose a Track for loading your Sample.
  2. Press the INST Button to view the INST screen.
  3. Hold Shift and turn the Value Knob to Select the IMPORT Category.
  4. Release Shift and turn the Value Knob to Select your Sample

PRO TIP

Alex Marlowe
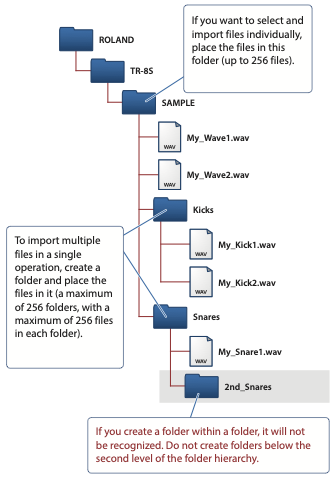
To make your production workflow smoother, try to get your sample loops in the correct key and tempo for your song before you export them into the TR-8S. In the case of sample loops that have an inherent tempo, like a drum loop or music loop, check to make sure the loop tempo is set to a whole number in BPM (for example 120, rather than 119.345). This will make it easier to sync your sample loop with the Pattern Tempo, if you decide to tune the sample once it’s inside the TR-8S.

Reversing a Sample:

  1. Press the Instrument Select Button of the Track containing your Sample.
  2. Hold Shift and press the INST Button to view the INST Edit screen.
  3. Turn the Value Knob to select Rate and press Enter.
  4. Turn the Value Knob to adjust the Rate.
With a Rate value of +1.00 the Sample plays forward at normal speed. With a Rate value of -1.00 the Sample plays in reverse at normal speed. Experiment with different Rate settings to see how they affect the playback of your Sample. Hold Shift as you turn the Value Knob to adjust the Rate value by increments of 10 at a time.

TR-8S Ultimate Guide

This Article is part of a series called The Ultimate Guide to the TR-8S Rhythm Performer, for the Guide’s Main Page click here.

Related Product

Related Posts

Scroll to Top

SIGN UP TO DOWNLOAD
THIS TD-50 CUSTOM PATCHES

Created by Roland V-Drums specialist Simon Ayton, these patches were designed using the internal factory sounds and many of the techniques covered in the TD-50 guide. Enjoy exploring the possibilities!