The TR-6S is a perfect companion piece with Ableton Live. Adding the TR-6S for hands-on drum programming, while using Live as your studio hub gives you full control over your production with the addition of high-quality Roland sounds. Perfect for saving you from digging through sample packs and adding a gratifying and fun hardware element to your setup.
In this guide, you’ll learn how to sync the two up, record multi-track audio, keep them locked in time and even use the TR-6S as a control surface for Live.
Contributed by Joel Tullemans for Roland Australia.
Disclaimer
This guide assumes that you have a basic understanding of Ableton Live and how to record audio in the software. There are many tutorials on YouTube explaining the ins and outs of using Live to record audio.
This guide is written as simply as possible to accommodate users of all levels. It does not give in-depth explanations on the functionality of the different features presented here.
“Ableton Live” will sometimes be referred to as “Live”.
Table of Contents
Connecting the TR-6S to your computer
Do not connect the TR-6S to your computer before you have finished installing the driver. If you have already connected the TR-6S, disconnect it, and then reconnect it after driver installation is completed.
To connect your TR-6S with Ableton Live, you will first need to download and install the appropriate drivers for your operating system (Windows or Mac OS). Head to the following link to download: https://www.roland.com/global/support/by_product/tr-6s/updates_drivers/
When you click the link and choose your operating system, take note of the troubleshooting link. In my case using Mac OS 10.15, I had to “allow” the driver to install properly. This is common on new Mac operating systems and can be difficult to fix if you don’t know what you’re looking for. It’s all in Roland’s guide in the above link.
Once the driver is downloaded, installed, and troubleshot (if necessary), connect your TR-6S to the computer via a USB cable. The TR-6S is USB powered, so connecting it to a computer is all you need to do to power it.
Now that you have installed the required driver and connected the TR-6S to the computer, switch it on and open Ableton Live (the lite version is free!) https://www.ableton.com/en/products/live-lite/
Setting up the TR-6S as an audio interface and recording audio
Open the Preferences menu in Live by clicking Live>Preferences. Then, select the Audio tab on the left of the Preferences menu.
Select the Audio Input Device drop-down menu, and select TR-6S (8 In, 4 Out) to allow Ableton Live to record audio via USB from the TR-6S.
Select the Audio Output Device drop-down menu, and select TR-6S (8 In, 4 Out) to allow Ableton Live to send audio via USB to the TR-6S.

Press Input Config to set up the input audio tracks.
Under “Mono Inputs”, activate them all by pressing the buttons (1 & 2, 3 & 4, etc.), highlighting them yellow.
Under “Stereo Inputs”, ensure that 1/2 is selected and also highlighted yellow.
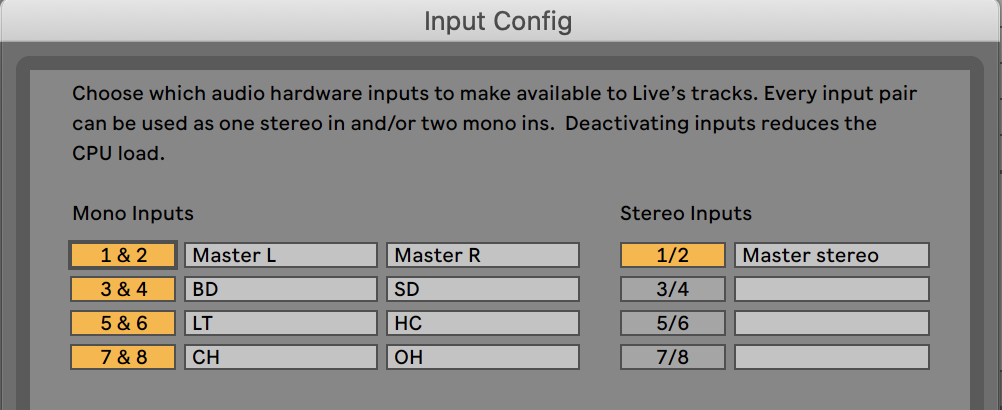
Feel free to name them as you like. I have named them according to the corresponding instrument channel on the TR-6S. I encourage you to do the same.
You can now record audio from the TR-6S directly into Ableton Live, with each channel on a separate audio track, which we will set up now.
Do you want to use the TR-6S with your existing interface?
With the setup described above, the TR-6S will be the only input into your computer. If you want to have multiple inputs, for example, the TR-6S and an audio interface for a microphone, you’ll need to set up an audio aggregate device (mac only).
If you have a need for multiple inputs, check out this guide below on how to get it set up.
How to Integrate Multiple Devices on your Mac
Setting up tracks in Ableton Live to record audio from the TR-6S
The TR-6S has 8 audio outputs available via USB. The 1st and 2nd channels are the MASTER (mono – L & R) outputs, which are useful if you just want to record the whole pattern as two audio files (L & R). However, I feel that it is most effective to record each instrument channel on its own audio track.
To do this, create 6 Audio tracks in Live by clicking: Create>Insert Audio Track. Ensure that the “Audio From” dropdown on each track is set to “Ext. In”, as shown below.
On each track, set the second drop-down menu to the following inputs:
- “3 BD” for the 1st track
- “4 SD” for the 2nd track
- “5 LT” for the 3rd track
- “6 HC” for the 4th track
- “7 CH” for the 5th track
- “8 OH” for the 6th track
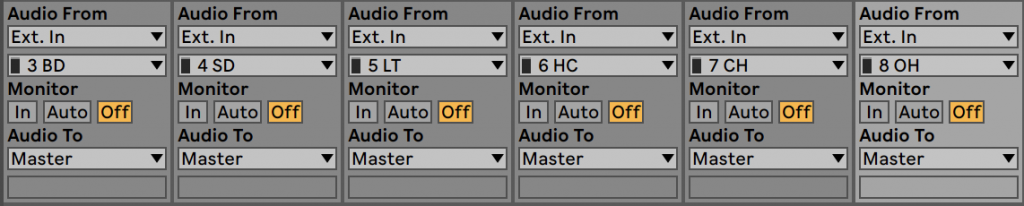
NOTE: If you did not name your inputs in the previous section, they will simply appear as “3”, “4” etc.
Now Ableton Live will be receiving audio from the 6 instrument channels on the TR-6S as separate tracks. This is incredibly handy for mixing and further production to the sounds!
If you want to also record the MASTER audio, create a new Audio Track in Live and set the “Audio From” to 1/2. This will record the MASTER output from the TR-6S on a stereo track.
Ensure that “Monitor” is set to “Off” for all of the audio tracks, as shown on the image above. Record-arm each track by clicking the button with the circle on each track highlighting them red, as shown below. Hold CMD+click on a Mac or CTRL+click on Windows to record-arm multiple tracks.
You can now record audio from the corresponding instrument channels on the TR-6S directly into Ableton Live! Great!
NOTE: If you are experiencing latency in your recordings in Ableton Live, refer to the following guide for steps on how to fix the problem: https://help.ableton.com/hc/en-us/articles/209072289-How-to-reduce-latency
Additionally, using Live’s inbuilt delay compensation feature can be a lifesaver when recording the TR-6S. Check out this guide from Ableton to learn more: https://help.ableton.com/hc/en-us/articles/209072409-Delay-Compensation-FAQ
Syncing the TR-6S with Ableton Live
Syncing the TR-6S with Ableton Live allows the 2 devices to START/STOP together and stay in sync while playing a pattern or project.
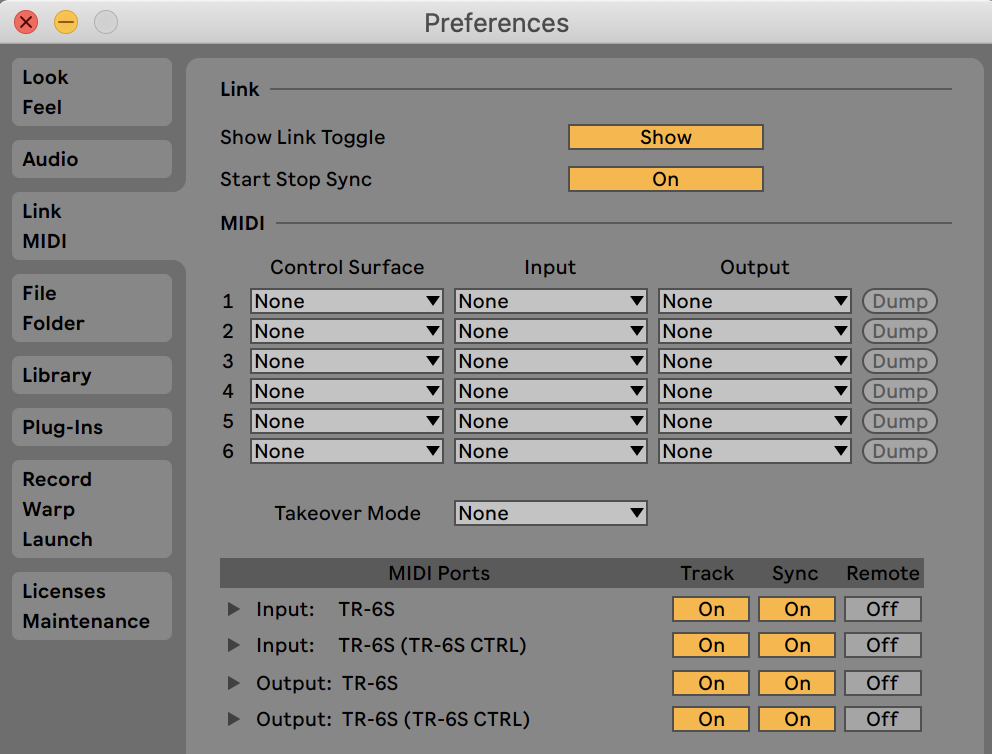
To sync, open the Preferences menu, then select the “Link MIDI” tab on the left.
Change your settings to the same as the image on the right. Now, whenever you press PLAY or STOP in Ableton Live, the TR-6S will also play, keeping the 2 devices in sync. Neat!
NOTE: Ableton Live will control the MASTER TEMPO.
In the top left corner of Ableton Live, there is a box that says “Ext”. Click it to highlight it YELLOW, which allows external gear connected to Live to start or stop the software.

Doing this will allow you to use the TR-6S to control the START or STOP for Ableton Live.
This setting will allocate the TR-6S as the MASTER TEMPO.
Now that the TR-6S and Ableton Live are set up to talk to each other and stay in sync, it’s time to talk about recording the MIDI data!
Recording MIDI into Ableton Live via USB
To record MIDI from the TR-6S into Ableton Live, create a new MIDI track by pressing Create>Insert MIDI Track. You can then simply record the MIDI data straight onto that track, then take the data from the clip and allocate it to different tracks as you see fit.
This is a cool way to use Live and the TR-6S together, for example, you could put a Drum Rack on a MIDI track, then record the MIDI data from the TR-6S onto that track, then assign whatever samples or plug-ins you like in that Drum Rack.
PRO TIP: If you are experiencing latency in your recordings in Ableton Live, refer to the following guide for steps on how to fix the problem: https://help.ableton.com/hc/en-us/articles/209072289-How-to-reduce-latency
Customising MIDI routing
The different parts of the KITS on the TR-6S align with the international MIDI standards for MIDI drum kits, however, if you would like to change the settings, press UTILITY, highlighting it GREEN. Scroll to the right until you see MIDI: Inst Note. Press VALUE. Here, you can change the MIDI note data for the different instrument channels (BD, SD, etc.).
It’s important to note that the TR-6S exports all of it’s MIDI note data on one channel, which defaults to MIDI channel 10. This channel can be changed by pressing UTILITY on the TR-6S, then holding SHIFT and turning the VALUE knob to the right until you see MIDI shown on the display. Release SHIFT and turn the VALUE knob to the right until you see MIDI: Pattern Ch 10. If you press VALUE, then turn the VALUE knob, you can change the MIDI channel from 1-16. Leaving it at channel 10 is fine if this is your only piece of external MIDI gear connected to Live.
If you don’t understand this, just leave it as default 🙂
Using the TR-6S as a MIDI controller
If you choose to use the TR-6S as a MIDI controller, it will disable audio from your TR-6S. You will need to find another way to listen to the audio from Ableton Live, such as an audio interface or output from your computer. Here’s how to set it up:
- On the TR-6S, press UTILITY to highlight it green.
- Using the VALUE knob, scroll to the right until you see “MIDI: Tx EditData” on the display. Press VALUE, then change it to ON and press the VALUE knob.
- Turn the VALUE knob to the right until “SOUND: Local Sw” is displayed. Press VALUE and change it to SURFACE. This disabled the audio engine on the TR-6S.
- Press UTILITY to exit the menu.
- In Ableton, ensure that the “Remote” button is switched on in the Link MIDI panel in preferences.
Your TR-6S is now a dedicated MIDI controller! Dive in and map MIDI values in Live to the parameters on the TR-6S as you would with any other MIDI controller. Unsure about how to do this? Ched out this article from Albeton on MIDI mapping. help.ableton.com/hc/en-us/articles/360000038859-Making-custom-MIDI-Mappings
Final thoughts
Having the ability to record audio via USB on separate tracks in Ableton Live (or another DAW) is a great feature to have included on the TR-6S. It makes capturing your ideas to develop further using your chosen production software quick, easy, and effective.
That’s it!! You’re done. Now, go make music!
Joel
www.sirpants.com