The 4 Cable Method (4CM), is a term usually heard in guitar-related conversations. It describes a way to connect your guitar to your effects pedals and amplifier. You connect using both your amplifier’s Input and its Effects Loop at the same time.
The ability to run guitar effects either into the Input of the amplifier, or within its Effect Loop (SEND / RETURN) circuit, gives you different tonal results. This includes a big difference in how time-based effects (such as reverbs and delays) interact with your amplifier’s overdrive channel.
To implement the 4 Cable Method, you’ll need the following:
- 4 quality guitar cables. If you’re using pedals, you’ll also need patch leads for connecting them to each other.
- An amplifier with an effects loop. The effects loop jacks are found on the back of the amp. Look for the SEND / RETURN circuit.
- Your effects pedals OR a compatible Multi-Effects processor. So, to connect a Multi-Effects processor using 4CM, it will need to have EXTERNAL LOOP capability. That is, it needs its own SEND / RETURN jacks in addition to the usual INPUT and OUTPUT.
- A guitar!
Contributed by Byron Struck for Roland Corporation Australia
The Method
4CM for Compact Pedals:
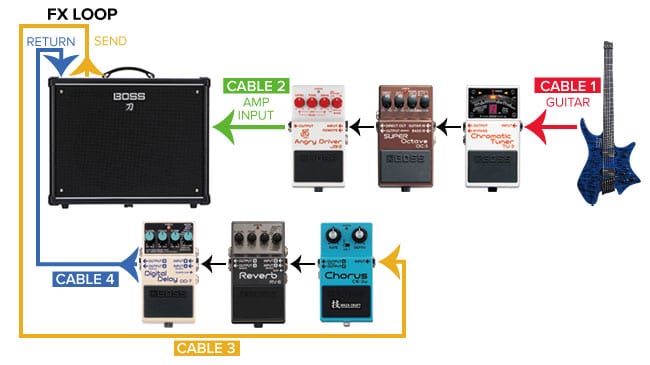
- RED CABLE 1: Connects your guitar to the INPUT of the pedals you wish to use BEFORE the amplifier.
- GREEN CABLE 2: Connects from the output of the above pedals, into the amplifier’s INPUT jack.
- YELLOW CABLE 3: Connects from the amplifier Effects Loop SEND, to the INPUT of the pedals you wish to place after the amplifier’s sound processing.
- BLUE CABLE 4: Connects from the OUTPUT of the above pedals to the amplifier’s RETURN jack – to be sent directly to the power amp and speaker.
4CM for Multi-Effects Processors:
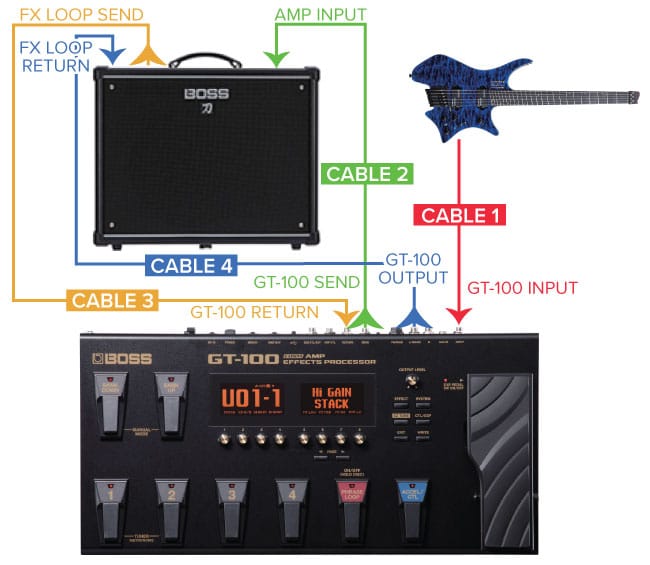
- RED CABLE 1: Connects your guitar to the INPUT of the Multi-Effects processor.
- GREEN CABLE 2: Connects from the Multi-Effects processor’s External Loop SEND, into the amplifier’s INPUT jack.
- YELLOW CABLE 3: Connects from the amplifier’s Effects Loop SEND, to the Multi-Effects processor’s External Loop RETURN.
- BLUE CABLE 4: Connects from the Multi-Effects Processor’s OUTPUT, to the amplifier’s RETURN jack – to be sent directly to the power amp and speaker.
When connected in this manner, most modern Multi-Effects processors (such as the BOSS GT-100) will allow you to move each individual effect within a preset/patch to be placed before the amplifier’s INPUT, or within its Effects Loop.
The Reason…. why use 4CM?
4 Cable Method lets us place effects either before or after the amplifier’s EQ section, and its internal overdrive/distortion effect (a.k.a. the gain stage).
Certain effects sound very different when placed before overdrive/distortion, or after. These differences are most obvious with time-based effects like reverb and delay. To a lesser extent, this includes modulation effects like phaser, flanger and chorus. For example, even a simple volume boost effect can work very differently, depending on whether it is placed before or after overdrive!
Why? A natural by-product of amplifier distortion is compression. So, the higher the level of preamp gain (distortion) used, the more compression appears. This alone is not a problem. In fact, it is this very compression that creates the great sustain that a high-gain guitar amp can achieve. But, the problem is that this massive compression can negatively affect the use of some guitar effects. Delay and reverb pedals for example, essentially compress to unusable levels when plugged into the INPUT of a high-gain guitar amplifier.
This very problem appeared during the high-gain guitar amp revolution of the 1980s. In order to use delay and reverb effects in high-gain amps, guitarists needed to place their effects after the preamp distortion, but before the power amp. Behold, the effects loop was born!
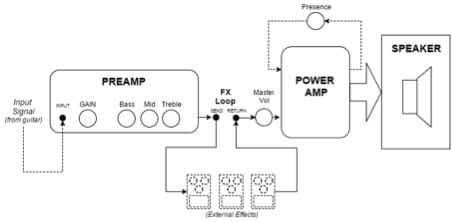
The Effects Loop
The effects loop sits between your preamp and your power amp. As a result, it allows you to place effects after the amplifier has imparted its tonality (including internal amplifier overdrive). But, they will still be in the circuit before the signal reaches the power amp and speaker. If you’d like more information on how the effects loop works, check out this article:
https://www.rolandcorp.com.au/blog/inside-guitar-amplifier-part-2
As we’ve described, the 4 Cable Method allows us to select whether we place our effects into the amplifier’s INPUT (before the amp’s internal overdrive) or into its EFFECTS LOOP (after the amp’s internal overdrive) in order to achieve our desired tone.
Finally, while there are no rules, it’s a good idea to figure out which effects you want where in your signal chain. So, if you’d like some ideas, please have a look at these articles:
https://www.rolandcorp.com.au/blog/order-effects-chain-simple-guide
https://www.rolandcorp.com.au/blog/how-to-chain-your-guitar-effects-pedals
Related Articles
INSIDE A GUITAR AMPLIFIER – PART. 1
INSIDE A GUITAR AMPLIFIER – PART. 2
HOW TO ORDER YOUR EFFECTS CHAIN: IT’S EASY WITH MULTI EFFECTS
HOW TO CHAIN YOUR GUITAR EFFECTS PEDALS – PART 1
ESSENTIAL TOOLS FOR THE MODERN GUITARIST
5 REASONS TO ADD THE DM-2W TO YOUR PEDALBOARD
SHADES OF TIME – WHAT THE BOSS DD-500 DIGITAL DELAY CAN DO FOR YOU
WHY SHOULD I BUY A SWITCHING SYSTEM?
Related Products