Let’s start with the concept behind the BOSS MS-3.
MULTIEFFECTS
We’re all familiar with the concept of a multieffects unit – it’s an all-in-one unit that contains many different types of effects. BOSS have been pioneers in the field of multieffects since the BOSS GT-5 in the early 90s, continuing to this day in units like the GT-1000, GT-1 and ME-80.
PEDAL SWITCHER
Pedal switchers are a slightly newer phenomenon – at least outside of huge pro touring rigs and racks. A switcher such as the ES-5 or ES-8 allows you to use all of the single pedals that you’ve collected over the years that create “your” unique sound, but without the hassle of tap dancing.
Basically, if you have a song that requires a quick change that turns OFF the delay pedal, turns OFF the overdrive but turns ON the fuzz, and turns ON an EQ pedal, the pedal switcher can be programmed to do all of this in a single footswitch press. It can save a lot of time and effort onstage, as well as helping you focus on playing instead of tripping over your own feet turning pedals on and off.
WHY NOT BOTH?
Now – what if your needs lie somewhere in between? Let’s say, you have a handful of prized stompboxes that you need for “your” tone, but you’d be happy to ditch the huge red pedal that you only use once every 20 songs or so? Then it’s time to say hello to the BOSS MS-3.
BOSS MS-3 – HAVE YOUR CAKE AND EAT IT TOO
It’s all in the name – it’s a Multi-Effects unit and pedal Switcher, with 3 loops to integrate your must-have stompboxes.
The MS-3 contains a whopping 112 built-in effects including delays, reverbs, modulation/pitch effects, overdrives, distortions, and more (and a tuner!). It’s basically the fully-fledged effects section from a GT-100, crammed into a super-compact enclosure. You can run six of these effects concurrently.
It’s also a pedal switcher. This is where it gets interesting. You have three separate loops for your desert island pedals that make you sound like you. If you’ve got an esoteric fuzz or a rare analog delay that you can’t live without, place these in one of the three loops and you’ll be able to turn them on and off independently, as well as position the onboard effects around them any way you want.
To top it all off, the MS-3 can also act as the command centre of your rig, switching amp channels via control outputs or MIDI.
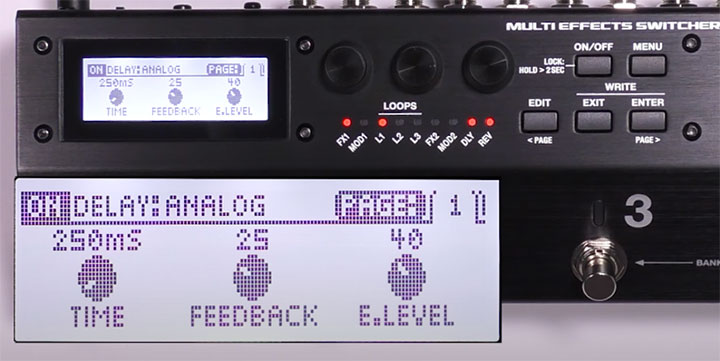
The first thing you’ll need to know to get around the MS-3 is that the three rotary knobs correspond directly to the three parameters that you see displayed at the bottom of the screen.
In the image below, that means:
Rotate Knob 1 to cycle through patches
Rotate Knob 2 to set the patch BPM
Rotate Knob 3 to set the patch level
Next, press the EDIT button. This will take you into editing mode where you can change the effects types, rearrange them, and turn loops on and off. You should see the screen display change to something similar to the image below.
In editing mode, the three rotary knobs now serve a different function:
Rotate Knob 1 to SELECT an effects block (i.e. to scroll through the different available blocks)
Rotate Knob 2 to MOVE an effects block around in the signal chain
Rotate Knob 3 to select the TYPE of effect
At this point, you’re well aware that the MS-3 features three pedal switching loops that you can use for your favourite stompboxes.
It’s important to note that the L1/L2/L3 block in MS-3 cannot be rearranged, unlike the ES-5 and ES-8 (which exist solely as pedal switchers without any internal effects, so their functionality around switching is a lot more advanced – you can rearrange pedal loops freely, run them in parallel, and so on).
You can arrange/drag and drop the internal effects blocks in any way you want around the L1/L2/L3 block, but you can’t put them in between the loops (i.e. you can’t put FX1 between L2 and L3). All that really means is that you need to carefully consider and fully understand how you want your loop block and overall signal chain to work, and make sure you arrange it all appropriately.
Once you’ve selected your effects, moved them around in the signal chain to your liking, and determined which of the pedal switching loops you want on or off, it’s time to save your settings!
First, press the EXIT and ENTER buttons simultaneously. The Write screen should appear, and give you three options – WRITE, EXCHANGE, or INITIALIZE (reset to blank patch). Use Knob 1 to select which one you want, and press ENTER.
To WRITE:
Rotate Knob 1 to select the TARGET (i.e. the patch number that you want to save to), then press ENTER
Use Knobs 1-3 to write in the patch name, then press ENTER
To EXCHANGE:
Rotate Knob 1 to select the TARGET (i.e. the patch number that you want to exchange with) then press ENTER
To INITIALIZE:
Rotate Knob 1 to select the TARGET (i.e. the patch number that you want to completely reset/clear) then press ENTER
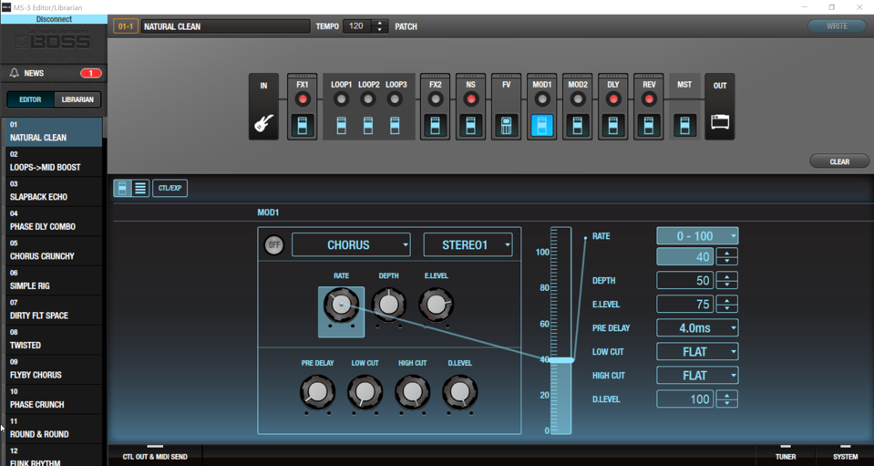
The alternative to all of the front panel programming we’ve just gone through is to use the MS-3 Editor/Librarian app for PC/Mac. This gives you a visual interface to programme your patches quickly and easily. You can use the editor to do everything that you can on the front panel, including turning loops on/off, rearranging effects blocks, changing parameters and assigns and more.
It’s also a lot quicker to type in the patch names!
Memory Mode is preset-based operation as you’ve probably encountered on any other multieffects unit. Choose whatever effects you want, whichever loops you want to be active, press save and voila! You can instantly recall this preset or memory setting at any time.
This is really handy if you want to jump from a basic clean tone to a sound which immediately has 4 effects active.
But what if you want to be able to turn off one of those 4 effects at different times during a song, or engage another effect just for a few seconds, and you don’t want to have to make a different preset each time?
This is where Manual Mode comes in.
Manual Mode is like a sub-layer to each preset that allows you to have direct control over discrete effects blocks, loops, or a variety of parameters like tap tempo.
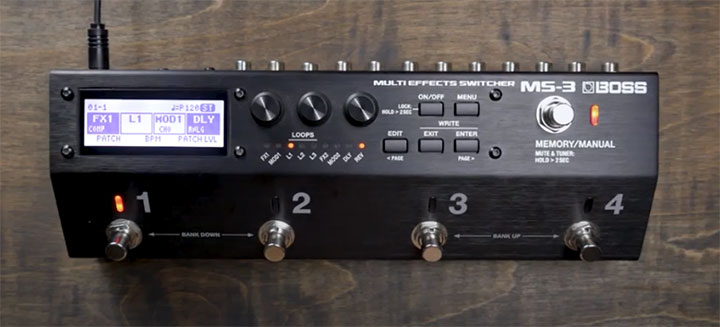
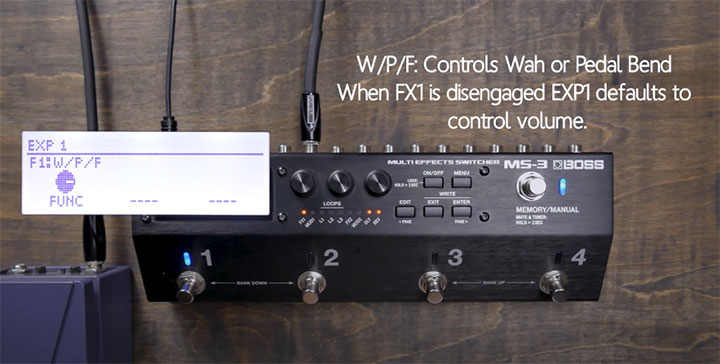
When you press the Memory/Manual footswitch to go into Manual Mode, the unit LEDs should all go red, and the display will change from patch name to 4 blocks that represent the function of the 4 footswitches when in Manual Mode.
Taking the picture above as an example, in Manual Mode now, Footswitch 1 now controls FX1, Footswitch 2 controls Loop L1, and so on.
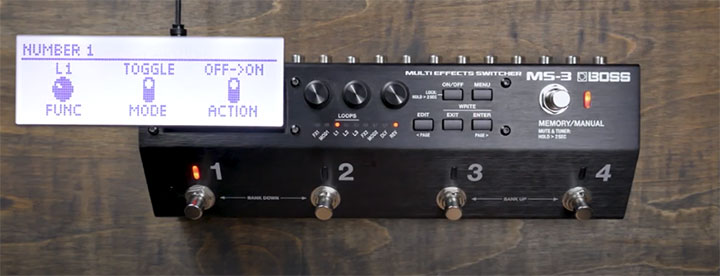
You can easily customise the function of each available switch in Manual Mode:
Press EDIT and use Knob 1 to scroll to CTL and press ENTER
Use Knob 1 to select NUM1 to NUM4 (depending on which footswitch you want to set the Manual function of) and press ENTER
You now have three parameters to set:
FUNC sets the function of the footswitch
MODE sets whether the switch is momentary (only active when you press it) or toggle (pressing turns it on and off)
ACTION sets whether the switch goes from OFF->ON or ON->OFF
Adding an expression pedal to the MS-3 can be your greatest secret weapon. It can be a volume pedal, a whammy pedal, a wah, and it can even control multiple effects parameters at the same time! All without the hassle and weight of additional pedals on your board.
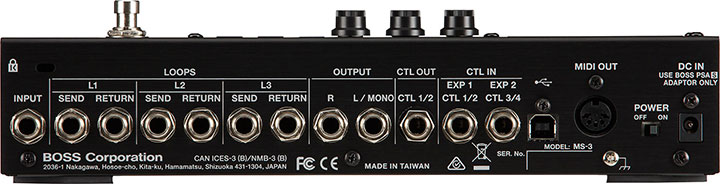
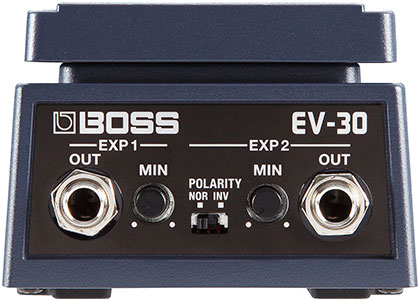
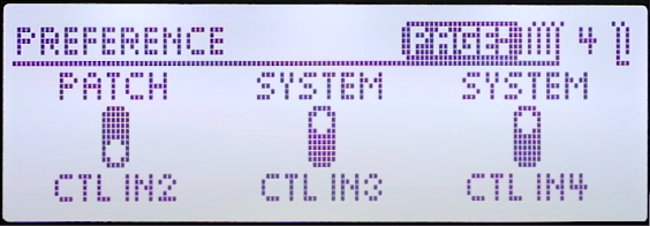
On the back of the unit you’ll see a pair of CTL IN jacks. These can be used to connect either an expression pedal, or additional control footswitches like the FS-6 or FS-7. In this section we’ll focus on using an expression pedal like the EV-30.
To connect the EV-30 to the EXP1 jack of the MS-3, you’ll need a TRS (stereo) cable – note that this is NOT the same as a normal instrument or patch cable. This cable is included with the EV-30 in the box. The hardware connection is completely straightforward, just connect the EXP1 out from the EV-30 to the EXP1 in on the MS-3. Once you’ve done this, it should automatically be assigned to the Foot Volume (FV) block on the MS-3. It’s now your volume pedal!
If you want to alter the function of your expression pedal:
Press EDIT to enter editing mode
Use Knob 1 to scroll all the way to the right until you see CTL and press ENTER
Use Knob 1 to scroll until you see EXP1 and press ENTER
You should now see a function control for the expression pedal, which you can use Knob 1 to cycle through. These are the options that you have:
OFF
FV (foot volume, the default)
F1 WH/PB (the expression pedal will control the wah or pitch bend effects for the FX1 block)
F2 WH/PB (as above but for the FX2 block)
F1 W/P/F (wah/pedal/foot volume – when FX1 is deactivated, it defaults back to foot volume)
F2 W/P/F (wah/pedal/foot volume – when FX2 is deactivated, it defaults back to foot volume)
The W/P/F setting is probably the most versatile, since it means that the expression pedal acts at a volume pedal normally, but turns into an expression pedal when you activate the wah/pitch bend effects in FX1 or FX2.
We’ll cover more advanced uses in the ASSIGNS section.
You might have noticed that the EV-30 has two EXP outputs, which matches the two EXP inputs on the MS-3! This means that you can effectively program in two different expression pedals without physically needing to have two units. Double the functionality and twice the space saving. Just follow the instructions above but substitute in “EXP2” instead of “EXP1”!
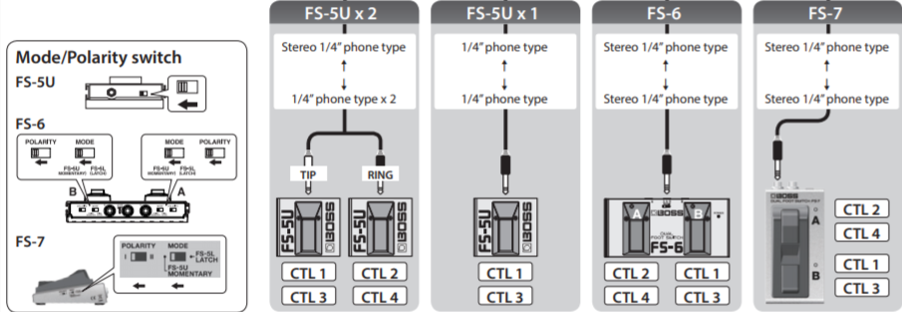
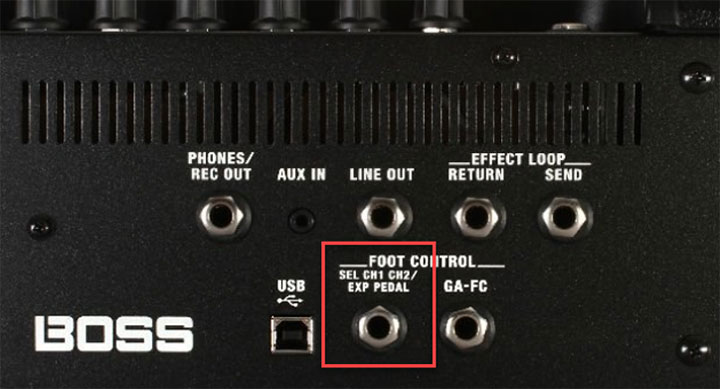
The pair of CTL IN jacks on the back of the unit can also be used to additional control footswitches like the FS-5, FS-6 or FS-7.
Connecting additional footswitches to the MS-3 can give you more immediate control and dedicated switches for things like:
Bank up/down
Patch up/down
Tap tempo
Amp channel switching
Solo switch for drive effects
Trigger switch for FX block effects like SOUND HOLD and WARP
And many more (refer to Parameter Guide for the full list)
Depending on which footswitch you’re using, connect per the diagram below:
CTL switches can be assigned to many different functions. We’ll go over two key examples so you get the idea, and refer to the user manual for more information on the rest.
Since you can set your MS-3 to turn a bunch of effects on or off as you switch between patches, the next step to have a completely integrated system free of too much tap dancing is to automate amp channel switching – and yes, the MS-3 will do that for you!
There are two ways to do it – via the CTL OUT jack, or via MIDI. In this section we’ll go over how to do it with the CTL OUT.
To connect the MS-3 to your amp, plug a cable into the CTL OUT of the MS-3, and then into the footswitch jack on your amp.
Let’s say we have two patches, Patch A and Patch B.
We’re going to tell the MS-3 that when it switches to Patch B, to send a signal via the CTL OUT so that it also tells the amp to change channels.
On Patch B:
Press EDIT to enter editing mode
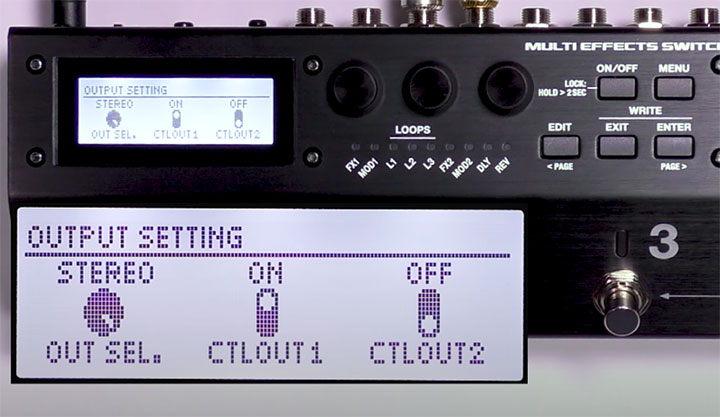
Use Knob 1 to scroll to OUTPUT and press ENTER
Use Knob 2 to set CTLOUT1 to ON
Save your patch
Now, when you switch between Patch A and Patch B, your amp should change channels as well!
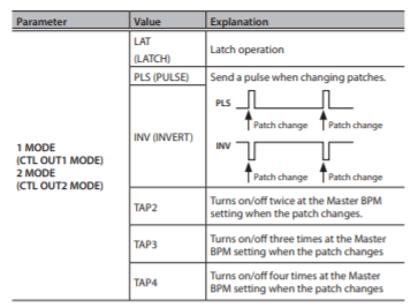
It’s important to note that not all amps use the same footswitching signals. For that reason, there are a few different options for the CTL OUT signal – read the manual of your specific amp and choose the right one. These parameters can be found in MENU -> CTLOUT.
The CTL OUT can also be used to control other pedals! For example, the JB-2 Angry Driver has a remote switching jack which allows you to toggle between modes. Instead of needing an external footswitch, you can just connect the CTL OUT jack on the MS-3 to the REMOTE jack of the JB-2, and you gain instant, footswitchable access to yet another great sound! Follow the instructions above to set it up for any pedal that accepts a remote switching connection.
As we discussed earlier, you can assign any of the footswitches to act as a tap tempo button in Manual Mode, or you can dedicate an external footswitch to this function – but what if neither of these methods really works for what you want to do?
Instead of using up an extra button, we recommend using CURRENT NUMBER. This basically means that, if you’re on patch 2, you can assign the additional function of BPM tap tempo to the same switch.
To set this up:
Press EDIT and use Knob 1 to scroll to CTL and press ENTER
Use Knob 1 to scroll to CURRENT NUMBER and press ENTER
Use Knob 1 to set to BPM Tap or DLY Tap
Now, when you exit out of editing mode and tap on Footswitch 2, you should see the BPM setting change.
The CURRENT NUMBER function can be applied to many other useful things as well, such as turning on the MASTER SOLO switch, or triggering FX1/2 functions. It’s worthwhile to explore this function to maximise the efficiency of your patch setup!
USING ASSIGNS — CONTROL MULTIPLE EFFECTS/PARAMETERS WITH ONE FOOTSWITCH
Let’s say that you want to be able to switch from a standard room reverb to an ambient reverb within the same patch. Since they’re such distinctly different effects, merely changing the effect TYPE won’t be enough — at the very least you’ll probably want to drastically change your effect level as well as reverb time.
What if we told you that there was an easy way to do this with a single footswitch, and you could turn on a phaser and turn off your overdrive block while you’re at it?
In theory, the MS-3 allows you to assign up to 8 different effects or parameters to a single footswitch. Talk about advanced control!
To access the ASSIGN settings:
Press EDIT and use Knob 1 to scroll all the way to the end to select CTL, then press ENTER
Use Knob 1 to scroll right until you see ASSIGN 1 (of 8 total), then press ENTER
Use Knobs 1-3 to set up your desired settings, and PAGE < and PAGE > to navigate through further pages of settings
The advanced user should become very familiar with how to use these assigns to perform a variety of tasks.
To understand the Assigns, it is important to understand the concept that, to assign a control, you must specify a source and a target — which requires an understanding of these two terms’ meaning:
Target: the parameter(s) or effects that we wish to control
Source: The method used to generate the control signal (e.g. footswitch or expression pedal)
Essentially, this is similar to the CTLIN functionality — except in that case, the “SOURCE” values were hard-coded to a specific footswitch. But with the Assigns, you can specify which footswitch does what. This is how you can assign multiple parameters to just a single footswitch press!
MIN and MAX are basically the values that your Target parameter will have when the footswitch is OFF and ON, respectively. You can use this to simply assign effects blocks to turn on and off, or you can get creative and tweak whole sets of parameters on the fly.
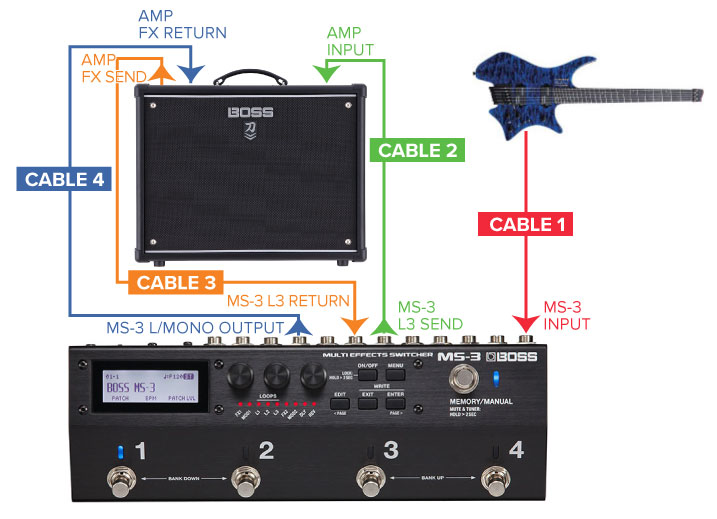
4 cable method is a great way to fully integrate the MS-3 with your amp, allowing you to use the drive channel of your amp while still being able to run crisp and clear delay and modulation sounds in the effects loop.
If you’re already schooled up on it and just want to know how to hook it up specifically with your MS-3, then read on!
To use 4CM on the MS-3, you’ll need to use up one of your three loops. How do you decide which one?
If you’re using two drive pedals in Loop 1 and Loop 2, then use Loop 3 for 4CM. This ensures that your drives are running into the front end of your amp as they should be.
If you’re using a drive pedal in Loop 1 and a delay pedal in Loop 2, then you should use Loop 2 for 4CM. This will place the preamp of your amplifier between the drive and delay (essentially this means the drive will run into the front of the amp and the delay will run in the effects loop).
If you’re using two pedals that would usually go in the loop, for example a delay and a reverb, then you should use Loop 1 for 4CM. This will place the delay and reverb in the effects loop of the amp.
Don’t forget – you can then freely position all the internal effects of the MS-3 anywhere around the L1/L2/L3 loop block!
For the purposes of this example, we’ll use L3 for the 4CM procedure.
STEP 1: Connect your guitar cable to the INPUT of the MS-3
STEP 2: Connect the L3 SEND to the INPUT of your AMP
STEP 3: Connect the EFFECTS SEND of your AMP to the L3 RETURN of the MS-3
STEP 4: Connect the L/MONO OUTPUT of the MS-3 to the EFFECTS RETURN of your AMP
Now that we’ve got all the hardware connections done, we need to make sure that L3 is activated so that it is getting signal to/from the amp.
STEP 1: Press the EDIT button
STEP 2: Rotate Knob 1 to scroll to select L3
STEP 3: Press the ON/OFF button. L3 should change from a dot to a stompbox icon (if it is a stompbox icon already, it’s active so you can skip this step!)
You’re now ready to enjoy full 4CM integration of your pedals, the MS-3, and your amp!
MIDI can sometimes be daunting for guitar players, but let’s try and keep it pretty simple.
In broad terms, the MS-3 can send MIDI messages to your MIDI capable pedals to do these things:
Turn pedals on and off (so you could have multiple pedals living in one loop, but still have control over turning them on/off separately)
Change presets on your pedals (jump straight to a tape delay sound on your DD-200 for your clean tone, but switch to an analog delay sound when you’re on the dirty channel)
Control parameters on your pedals (to take control of knob or footswitch functions)
Send tempo information
Each patch can send 4 MIDI messages every time you activate that patch.
Within each of those 4 MIDI messages, you can send:
1x Program Change
2x Control Change
This means that every time you change a patch, you can tell 4 different MIDI-capable pedals to change presets, as well as affect up to 8 different parameters (2 per pedal) – pretty powerful!
If you only have one pedal that you want to control via MIDI, it’s very simple – connect the MIDI OUT from the MS-3 to the MIDI in on your pedal.
However, if you have several MIDI capable pedals that you want to control, you’ll need to daisy chain them together. It’s basically the same concept as connecting up pedals with patch cables, but with MIDI instead. The MS-3 sends the MIDI data out to the first pedal, and you’ll need the pedal to then pass on the MIDI data on to the next one and so on.
Be aware that not all pedals will have both MIDI IN and MIDI OUT/THRU. If the pedal only has MIDI IN, then it can only receive MIDI data but it can’t pass it on – so put this pedal last in the chain of MIDI connections.
Aside from this, the actual order of the pedals does not matter – we’ll determine which pedal receives what information using the Tx/Rx (transmit/receive) channels.
The first thing you’ll need to do is coordinate the MIDI send/receive channels between your MS-3 and your pedal(s).
The MS-3 can send MIDI information on 16 different channels, so that it can send different messages to different pedals without muddling it all up. This means that you’ll need to coordinate what channel you’re using to send information out, and set your pedal to receive on that same channel.
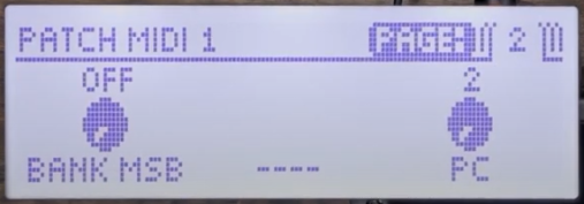
To set the channel for your Patch MIDI setting:
Press EDIT and use Knob 1 to scroll to CTL and press ENTER
Use Knob 1 to scroll to PATCH MIDI 1 and press ENTER
On Page 1 you should see the CH parameter. Use Knob 1 to change from OFF to whatever number setting you want (for example, CH 5)
On your effects pedal, consult the manual to enable MIDI PC/CC input, and also to set the Rx channel to the same number as you’ve set on the MS-3
If you need to send separate messages to several pedals, make sure that the channels match. For example:
Set CH 1 on PATCH MIDI 1 and Rx channel to 1 on your DD-200
Set CH 2 on PATCH MIDI 2 and Rx channel to 2 on your MD-200
Set CH 3 on PATCH MIDI 3 and Rx channel to 3 on your RV-500
Once you’ve set the correct Tx/Rx channels between your MS-3 and pedal, you’re now ready to send Program Change (PC) messages to allow you to change presets on your pedals at the same time as you change presets on the MS-3.
Press EDIT and use Knob 1 to scroll to CTL and press ENTER
Use Knob 1 to scroll to PATCH MIDI 1 and press ENTER
Use PAGE> (ENTER) to navigate to Page 2
Use Knob 3 to change the PC number to the corresponding PC number for the preset you want from your pedal (consult the manual for the specific pedal to find the numbering convention)
Save your settings
Now when you activate that preset on your MS-3, it will send a PC message out to your pedal to tell it to activate the appropriate preset as well.
SENDING CC MESSAGES (PATCH BASIS OR USING ASSIGNS)
There are two ways to send Control Change messages – on a patch basis or using Assigns.
Let’s start with doing it on a patch basis. It’s located in the PATCH MIDI settings that we went through in the previous two sections.
Press EDIT and use Knob 1 to scroll to CTL and press ENTER
Use Knob 1 to scroll to PATCH MIDI 1 and press ENTER
Use PAGE> (ENTER) to navigate to Page 3
Use Knob 1 to select the CC1 NUM that corresponds to the parameter you want to change (consult the manual of the effects pedal in question)
Use Knob 3 to select the CC1 VAL (what setting you want that parameter to be set to)
As we mentioned earlier, you can send two CC messages per PATCH MIDI setting. You’ll find the options for CC2 on Page 4 of the same menu.
Implementing the CC messages on a patch basis means that the MS-3 will only send out the CC messages when you switch between patches on the unit. However, you may want more direct control to be able to turn a pedal on/off via MIDI without having to change presets on the MS-3.
If so, then you’ll need to send the CC messages using Assigns.
Press EDIT and use Knob 1 to scroll all the way to the end to select CTL, then press ENTER
Use Knob 1 to scroll right until you see ASSIGN 1 (of 8 total), then press ENTER
The key setting here is on Page 2 – set the CATEGORY to MIDI using Knob 1.
Use Knob 2 to set the Tx/Rx channel, and Knob 3 to set the CC number
There’s one final piece of the MIDI puzzle that we should talk about – sending MIDI clock.
If you have a MIDI-capable delay pedal like the DD-200 for example, not only can the MS-3 send all the program and control change data that we discussed earlier, but you can also send tempo/clock information!
This means that if you’ve set up a BPM tap tempo switch on the MS-3, you can then send this tempo data to your DD-200 to allow it to sync its delay times!
All you need to do is press MENU -> MIDI and make sure CLK OUT is set to ON.
On the pedal side, you’ll need to make sure that it’s set to accept MIDI clock (this will vary from pedal to pedal so make sure to read the specific product manual).