So, you’re rocking a BOSS or Roland amp with a bunch of cool features and effects on board. You want to use these features and effects while you’re playing, but you only have two hands, and those hands are both a little pre-occupied holding your guitar. Enter the GA-FC.
The GA-FC is the master foot controller for most stage-ready BOSS and Roland amps. It’s clear and easy to operate, with six separate switches, so there’s no tapdancing required. You can also connect up to two additional footswitches or expression pedals to unlock even more control. And, because it’s a universal device, it also means if you upgrade, or just buy another BOSS/Roland amp, you don’t need to buy a new foot controller to take full command of it.
Let’s run through the full list of BOSS and Roland amps the GA-FC is compatible with and check out the control options they give you. For the sake of clarity in this article, the individual switches on the GA-FC are addressed numbered 1-6 from left to right.
KATANA-100 MkII / KATANA-100/212 MkII / KATANA-HEAD MkII / KATANA-Artist MkII
Blues Cube Artist / Blues Cube Artist212 / Blues Cube Tour
Nextone Artist / Nextone Stage
Acoustic Singer Live / Acoustic Singer Pro
WAZA Tube Amp Expander
KATANA-100 MkI / KATANA-100/212 MkI / KATANA-HEAD MkI / KATANA Artist MkI
FAQ:
Which BOSS GA-FC version do I need for my amp?
This is a commonly asked question! There’s only one version of the GA-FC. Because the GA-FC is universal, the factory markings on the controller may not correlate with your amp. Don’t worry, every BOSS / Roland amp which is compatible with the GA-FC includes stickers in the box to cover the factory control markings and accurately describe the control functions as they relate to your specific amp.
What cable do I need to connect the GA-FC to my amp?
The GA-FC connects to all amps with a ¼” TRS cable, not a regular guitar cable (TS cable). It comes with a cable included, but if you ever need to replace it, or want to upgrade to something more heavy duty, you can use the BOSS BCC-3-TRA. TRS and TS cables can get confused because have the same sized connector, but you can see the difference here.
| TRS CABLE | TS CABLE / ‘GUITAR CABLE’ |
|---|---|

|

|
| TRS cables have an extra band on the connector, dividing it three sections: the Tip, the Ring and the Sleeve | TS cables have a single band on the connector, dividing it into two sections: the Tip and the Sleeve |
What footswitches and expression pedals are compatible with the GA-FC?
How do I connect additional footswitches or expression pedals to the GA-FC?
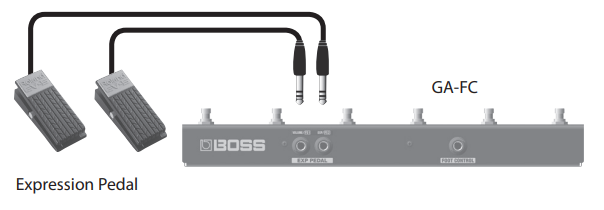
Compatible expression pedals are the Roland EV-5, BOSS EV-30, FV-500H, FV-500L. For connecting expression pedals to the GA-FC you should use a TRS cable.

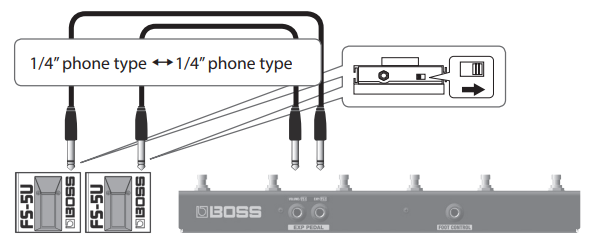
Compatible footswitches are the BOSS FS-5U, FS-6, FS-7 (the FS-6 and FS-7 dual-footswitches should be run from the individual A/B outputs, and should be switched to ‘momentary’ control mode). For connecting additional footswitches to the GA-FC you should use a TS cable.

KATANA-100 MkII / KATANA-100/212 MkII / KATANA-HEAD MkII / KATANA ARTIST MkII

1. CH 1 – Selects user Tone 1A/1B
2. CH 2 – Selects user Tone 2A/2B
3. CH 3 – Selects user Tone 3A/3B
4. CH 4 – Selects user Tone 4A/4B
[FOR KATANA ARTIST Mk II ONLY]
When held for one second or longer, Switches 1-4 engage solo boost on your selected tone
5. PANEL – Reverts tone control to the exact position of the knobs on the control panel
(in this setting LED indicator is lit solidly).
⁃ When held for one second or longer PANEL switch begins blinking and changes operation to Bank B. Switches 1-4 are now dedicated to selecting user Tones 1B-4B. (When PANEL switch is unlit, operation is dedicated to Bank A)
6. EFFECTS – Engages effect ON/OFF control
⁃ When ON, Switches 1-5 are now dedicated to independently engaging individual effects, as specified by text above the LED indicator:
i. BOOSTER – ON/OFF
ii. MOD – ON/OFF
iii. FX – ON/OFF
iv. DELAY – ON/OFF
v. REVERB – ON/OFF
[FOR KATANA ARTIST Mk II ONLY]
When the EFFECTS Switch is held for one second or longer, Switch 4 becomes a TAP tempo for Delay 1, and Switch 5 becomes a TAP tempo for Delay 2
By default, FS1 controls Bank A/B switching, and FS2 is a Tap Tempo for delay 1. The footswitches can be assigned to control:
– Tap tempo for inbuilt delay 1 or 2
– Solo boost ON/OFF
– Effects loop ON/OFF
– PEDAL FX (expression effects like wah and pitch shift) ON/OFF
– EQ (inbuilt 10-band or parametric EQ) ON/OFF
– BANK A/B – a dedicated bank switch
By default, EXP1 controls volume, and EXP2 controls ‘PEDAL FX’). The expression pedals can be assigned to control:
– Pedal FX
– Volume (input or master)
– Volume and Pedal FX (controls Pedal FX when engaged, controls volume when Pedal FX are bypassed)
– Assigned control – to control expression of essentially any parameter of your inbuilt effects
You can fully customise the functionality of these controls for each User Tone in Boss Tone Studio.
You can also use the expression input on the back of the KATANA to add an extra expression pedal.
For a detailed rundown of using the GA-FC with the Katana MkII amps, check out this video!

Blues Cube Artist / Blues Cube Artist212

When connected the GA-FC switches control, from left to right:
SELECT
1. CLEAN – Selects the amp’s CLEAN channel
2. CRUNCH – Selects the amp’s CRUNCH channel
3. DUAL TONE – Runs the CLEAN channel and the CRUNCH channel together in parallel
BOOST
4. CLEAN – Turns the CLEAN channel’s BOOST ON/OFF
5. CRUNCH – Turns the CRUCH channel’s BOOST ON/OFF
• Either BOOST switch, or both, can be engaged when using DUAL TONE for different effect
6. FUNCTION – Reverts control of Switches 4-5 to controls listed above the LED indicator
iv. TREMOLO – Turns this inbuilt TREMOLO ON/OFF
v. EFX LOOP – Turns the EFFECTS LOOP ON/OFF
The two inputs on the GA-FC will accept a footswitch (FS-5U) and/or up to two expression pedals (EV-5, EV-30, FV-500L, FV-500H).
1. Footswitch or expression pedal
• Footswitch controls tap tempo for inbuilt TREMOLO
• Expression pedal controls input volume
2. Expression pedal controls master volume
Blues Cube Tour
When connected the GA-FC switches control, from left to right:
SELECT
1. CLEAN – Selects the amp’s CLEAN channel
2. CRUNCH – Selects the amp’s CRUNCH channel
3. DUAL TONE – Runs the CLEAN channel and the CRUNCH channel together in parallel
BOOST
4. CLEAN – Turns the Clean channel’s Boost ON/OFF
5. CRUNCH – Turns the Crunch channel’s Boost ON/OFF
• Either Boost switch, or both, can be engaged when using DUAL TONE to achieve different sounds
6. FUNCTION – Reverts control of Switches 4-5 to controls listed above the LED indicator
iv. EFX LOOP A ¬– Turns Effects Loop A ON/OFF
v. EFX LOOP B – Turns Effects Loop B ON/OFF
The two inputs on the GA-FC will accept two expression pedals (EV-5, EV-30, FV-500L, FV-500H).
1. Expression pedal controls input volume
2. Expression pedal controls master volume
Nextone Artist / Nextone Stage

When connected the GA-FC switches control, from left to right:
CH-SELECT
1. CLEAN – Selects the amp’s CLEAN channel
2. LEAD – Selects the amp’s LEAD channel
3. BOOST – Turns the amp’s BOOST ON/OFF
4. TONE – Turns the amp’s TONE function ON/OFF
EFFECT
5. EFX LOOP – Turns the Effects Loop ON/OFF
6. DELAY – Turns the amp’s inbuilt Delay ON/OFF
The two inputs on the GA-FC will accept a footswitch (FS-5U) and/or up to two expression pedals (EV-5, EV-30, FV-500L, FV-500H).
1. Footswitch or expression pedal
• Footswitch controls tap tempo for inbuilt delay
• Expression pedal controls input volume
2. Expression pedal controls master volume
Acoustic Singer Pro / Acoustic Singer Live

When connected the GA-FC switches control, from left to right:
GUITAR
1. CHORUS – Turns the guitar channel’s chorus ON/OFF
2. REVERB – Turns the guitar channel’s reverb ON/OFF
MIC
3. DELAY/ECHO – Turns the mic channel’s delay/echo ON/OFF
4. REVERB – Turns the mic channel’s reverb ON/OFF
5. HARMONY – Turns the vocal harmony effect ON/OFF
6. MUTE – Mutes the amplifier
The two inputs on the GA-FC will accept two expression pedals (EV-5, EV-30, FV-500L, FV-500H).
1. Expression pedal controls guitar volume
2. Expression pedal controls vocal harmony volume
The looper on the ACS-Pro / ACS-Live amps, can be controlled by connecting an FS-5U switch to the looper input on the amp back of the amp.
WAZA Tube Amp Expander

When connected the GA-FC switches control, from left to right:
1. FX LOOP – Turns the Effects Loop ON/OFF
1+2 (Pressed in combination). REVERB – Turns the inbuilt Reverb ON/OFF
2. DELAY – Turns the inbuilt Delay – ON/Off
3. TAP – Tap Tempo for inbuilt Delay
4. SOLO/EQ – Turns the inbuilt EQ ON/OFF
5. AMP CTL – Engages the channel switch on your tube amp
6. RIG – Allows you to quickly switch between your 10 preconfigured ‘RIG’ settings
• When engaged the RIG switch becomes lit, and switches 1-5 become dedicated to selecting RIGs 1-5
• When held for one second or longer, the RIG switch begins blinking. Switches 1-5 are now dedicated to selecting RIGs 6-10
The two inputs on the GA-FC will accept two expression pedals (EV-5, EV-30, FV-500L, FV-500H).
1. Expression pedal controls volume PRE EFFECT (before the internal effects)
2. Expression pedal controls MAIN OUTPUT (speaker and line out volume)
KATANA-100 MkI / KATANA-100/212 MkI / KATANA-HEAD MkI / KATANA Artist MkI

When connected the GA-FC switches control, from left to right
1. CH 1 – Selects user Tone 1A/1B
2. CH 2 – Selects user Tone 2A/2B
3. CH 3 – Selects user Tone 3A/3B
4. CH 4 – Selects user Tone 4A/4B
5. PANEL – Reverts tone control to the exact position of the knobs on the control panel
(in the setting LED indicator is lit solidly).
⁃ When held for one second or longer PANEL switch begins blinking and changes operation to Bank B.
Switches 1-4 are now dedicated to selecting user Tones 1B-4B.
(When PANEL switch is unlit, operation is dedicated to Bank A)
6. EFFECTS – Engages effect ON/OFF control.
⁃ Switches 1-5 are now dedicated to independently engaging/controlling individual effects and your effects loop, as specified by text above the LED indicator:
i. BOOSTER/MOD – ON/OFF
ii. DELAY/FX – ON/OFF
iii. TAP – Tap tempo for inbuilt delay ON/OFF
iv. REVERB – ON/OFF
v. LOOP – Turns the Effects Loop ON/OFF

