If you’ve been following along through the previous 2 sections of this guide, you should have a pretty good understanding of programming beats and adding and recording effects. If you’re new to programming Roland gear, I’d highly recommend reading the first 2 sections if you haven’t done so already so you’re up to speed. Otherwise, read on to learn how to become a TR-6S patterns master!
Part 1: https://rolandcorp.com.au/blog/tr-6s-ultimate-guide-basics
Part 2: https://rolandcorp.com.au/blog/the-ultimate-guide-to-the-tr-6s-effects
Now, without further ado, let’s move on to programming variations and fills into your beats.
Table of Contents
Copying patterns and adding variations & fills
Taking your patterns to the next level all starts with copying and pasting patterns. From there you can make variations, add fills, and chain patterns together.
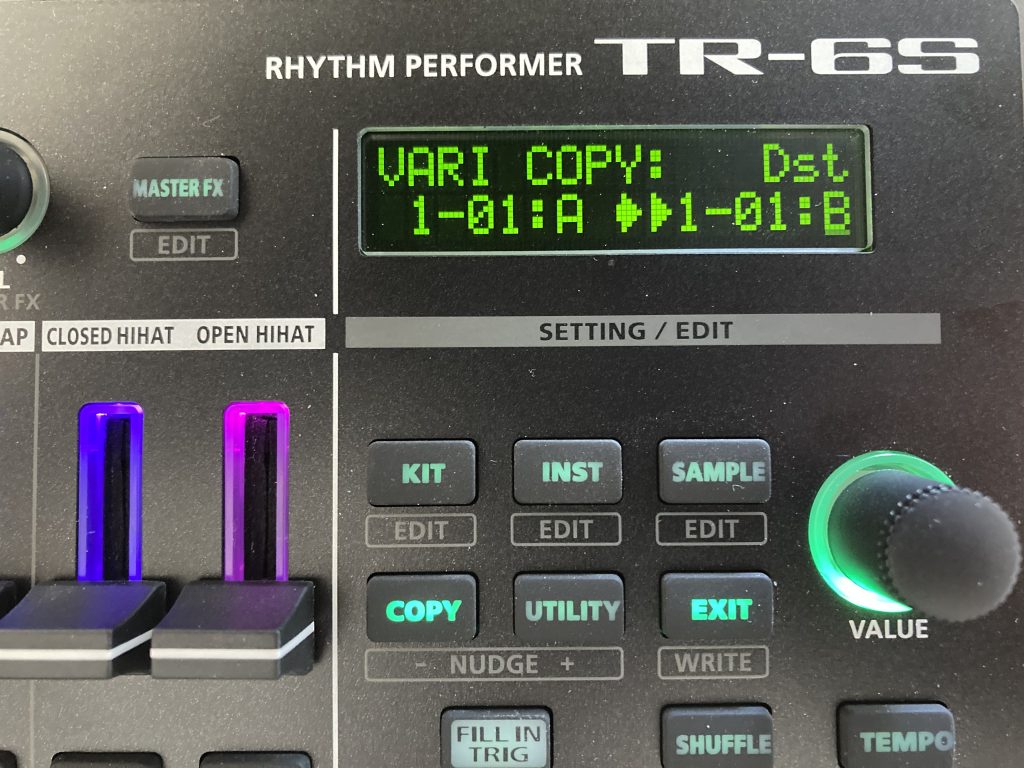
Here’s how to copy and paste a pattern:
- Select COPY and use the VALUE knob to scroll to Pattern.
- Press VALUE and select your target PATTERN to copy. The TR-6S defaults to the current pattern.
- Press VALUE, then select the destination for your pattern to copy to.
- Press VALUE, then press VALUE again.
Executing… Completed!
But really, a 1 bar pattern just isn’t gonna cut it. Let’s take our pattern into real-world territory. If you haven’t already, stop your pattern by pressing START/STOP.
If you’ve been following this guide and want to copy the current VARIATION A to VARIATION B in the same pattern, press COPY, scroll to find Variation, the display will show “5-01:A >>5-01:A“. Press VALUE 3 times (while watching the display), turn the VALUE knob once to the right, displaying “5-01:A >>5-01:B”, press VALUE twice. Completed!
You can use the COPY menu to copy a PATTERN, VARIATION, TRACK, KIT, or INST.
To hear this change, press VARIATION and 8 of the pads along the bottom of the device will turn blue, with the far-left pad brighter than the rest (this is because we have been working on variation A). This shows us that we have 8 variations that can be played in succession, in any order we chose, from left to right. If you read below the 8 BLUE pads, it says “VARIATION A, B, C, D, E, F, G, H”. If you watched the LCD after we pressed COPY earlier, you would have noticed that we copied variation A to variation B. Now we have 2 variations that are identical (so not really variations, right?).
How do I chain patterns on the TR-6S?
To hear these in succession, press and hold the step corresponding to A and press the step for B. Now both pads for variation A and B are brighter than the rest.
Press START/STOP to play your pattern. You will notice the 2 bright BLUE pads flashing in succession. This means that your pattern is now playing variation A, followed by variation B, and then repeating. Now you can go into your pattern by pressing TR-REC, selecting the track that you want to change and making changes as you see fit.
PRO TIP: You don’t have to copy a VARIATION to use it. You can simply press VARIATION, select one of the blue pads on the step sequencer, and start entering in data either using TR-REC or INST REC mode.
But wait!! Which variation am I editing??
Hold TR-REC until the bottom pads change. Whichever pad is glowing PURPLE is the variation you’re editing!
While holding TR-REC, choose a pattern (either by pressing it or by turning the VALUE knob) to edit it, without changing what is playing. Pretty neat, huh?
Programming fills
Okay, now let’s use variation H as our fill. Why? Because variation H feels good. Hold TR-REC and press the pad H, it will flash RED because there is no content on that variation yet. Press TR-REC, press SD, then put a note on the first, third, fifth, seventh, ninth, then all the remaining pads. Standard, yet effective.
Hold SHIFT, then press FILL IN TRIG, ensure that Sw is set to ON, Cycle is set to 4 (or any number you want really), and Select is set to H. Now, on every 4 bars (or whatever you chose) your pattern will play variation H instead of whichever variation was next. Sweet!
To add a dedicated fill so your 8 variations can be saved for your epic beatz, hold TR-REC and turn the VALUE knob while watching the display until 1 or 2 appears in the top right. These are your FILL1 and FILL2 locations. When you release TR-REC, you can use the step sequencer to program the fill you selected. Then hold SHIFT, press FILL IN TRIG, and set Select to FILL1 or FILL2.
In the real world, every 4 bars might be too often for one fill, but whatever sounds good to you is fine! It’s music, there are no rules! 🙂
Using step loop and last step
STEP LOOP is pretty straight-forward. While STEP LOOP is highlighted green and your pattern is playing, whatever step you press will trigger for as long as you hold it. Your pattern will continue to play in the background, so when you release the pad, it will keep playing like nothing happened.
LAST STEP mode lets you determine the length of a variation or a track. To activate LAST STEP mode, hold SHIFT and press STEP LOOP (LAST) so STEP LOOP flashes green.
To change the length of a TRACK, select the track you want to set the length of, or select multiple by holding track buttons, then press a step on the sequencer. The GREEN pads represent the length of the track. To clear the length, select your track(s) and press CLEAR.
To change the length of a PATTERN, turn the VALUE knob while STEP LOOP is flashing, then turn the VALUE knob to select the VARIATION [A]-[H] or FILL [1]-[2] that you want to change the length of. Then, press the step on the sequencer that you want to be the last step of the PATTERN. To clear the length of a PATTERN, select the VARIATION or FILL and press CLEAR. Easy!
PRO TIP: You can use a gradually decreasing pattern length to make big builds… just make sure you have the drop to follow it 😀
Saving your creation
After all that hard work making this epic pattern or kit, you definitely don’t want to lose it! To save, hold SHIFT and press EXIT (WRITE) and choose between Overwrite, Pattern, Kit and System.
Overwrite will save everything as it stands. Pattern will save the PATTERN. Kit will save the KIT. System will save any SYSTEM changes (more on that later).
The display defaults to Overwrite, so press the VALUE knob, make sure that [OK] is flashing on the display, then press VALUE again to save your pattern.
You can freely move between patterns without losing them, but if you power down the TR-6S, you will lose what you have done since you last saved!
PRO TIP: Save often!
How to turn up instruments on the TR-6S
To adjust the level of each instrument, we’ll use the gain control. Simply put, gain is the volume that the instrument or sample is set at, before it goes through the volume fader. To adjust gain on the TR-6S, select the channel that you’d like to edit the gain setting for. Hold SHIFT and press INST. Use the VALUE knob to cycle through the menu on the display until you see Gain 0.0dB. Confirm your selection by pressing VALUE, then increase or decrease the GAIN as you see fit. Press another instrument to quickly change the gain while you’re there.

Generating a random pattern
Stuck for a new idea? The TR-6S allows you to generate a random pattern at the press of 2 buttons! Hold PTN SELECT and press SAMPLE, then bam! Random pattern.
This pattern is only temporary until you press the flashing TR-REC button.
Applying LFO to your pattern
LFO stands for Low-Frequency Oscillation. It’s an effective and easy way to add modulation and evolution to your patterns. Basically, it increases and decreases the chosen parameter continuously at a rate that you set. Don’t worry if that doesn’t make sense, let’s try it out!
To add the LFO to your instrument, hold SHIFT and press INST to bring up the instrument menu as we have done earlier. Select an instrument to add the LFO to, then use the VALUE knob to scroll to find LFO Tune. You can tell the LFO to affect the Tune, Decay, Level, Pan, ReverbSend, DelaySend, InstFX, or the CTRL knob, which will vary depending on what you’ve set for the instrument previously.
Let’s choose Pan for now, confirm your selection by pressing VALUE, then scroll one click to the right using the VALUE knob, and you will see LFO Depth on the display. Press VALUE, then change the number. Cool, huh?
LFO Settings
So now we’ve applied the LFO to an instrument track, let’s fine-tune the LFO itself. Hold SHIFT and press KIT, then hold SHIFT and turn the VALUE knob until you find KIT:LFO. Here you can change the Waveform of the LFO, the Temp Sync, and the Rate. Let’s leave it on Waveform SIN make sure that Tempo Sync is set to ON, then we can change the Rate setting.
If TempoSync is set to ON, then the larger the Rate number, the longer the LFO will take to travel from the top to bottom of the sine wave. A shorter Rate number will be a rapid change.

If TempoSync is set to OFF, then a smaller number will be a longer frequency, and a longer number will be a shorter frequency, or a more rapid change.
I recommend familiarising yourself with the LFO, change the Waveform type, the Rate, and the parameter that the LFO modulates. Do this by holding SHIFT and pressing INST and changing the LFO from Pan to something else, such as Tune or Level.
PRO TIP: Using the LFO to modulate Decay, with a short Rate (between 0.25step-16.00step) can be a good way to add some human feel to a hi-hat groove. A lower LFO Depth can be a nice way to add subtle change to a track.
Instrument choking (mute)
The TR-6S allows us to have one instrument mute another instrument when it triggers. A good example would be a closed hi-hat silencing an open hi-hat, which is usually set by default. Let’s check!
This is best demonstrated when you have a rolling CH rhythm, and an off-beat OH driving the pattern. Consider saving your pattern and creating a new one for demonstration purposes.
On a new pattern, select the CH instrument, press TR-REC and put a note on all 16 of the steps, except the 3rd, 7th, 11th, and 15th steps. Then select the OH, and put a note on the 3rd, 7th, 11th, and 15th steps.
Hold SHIFT and press KIT, then hold SHIFT and turn the VALUE knob until you see KIT:MUTE on the display. Release SHIFT, then turn the VALUE knob until you see OH on the left of the display. Press VALUE, then scroll until it says OH>CH on the display. Now, whenever the CH instrument triggers, it will silence the OH instrument. Cool!
As far as I can tell, this only works when the instrument is under the category that the choke, or MUTE, is assigned to. For example, if you have the CH choking the OH (displayed as OH>CH), but the OH channel has a Tom on it, the choking won’t apply.
PRO TIP: This is good to emulate a “real” drummer. But let’s face it, we’re already drummers with the TR-6S anyway… right??
Adding sub-steps to your pattern (rolls and flams)
The TR-6S allows you to create some pretty wild trills and rolls on patterns, which can be really fun, especially for hi-hat rhythms. Think classic hip-hop or trap hats. Let’s use the same style hi-hat rhythm that we created in the previous step and add some extra rolls and trills.
Select the CH channel, press TR-REC, then press SUB. Now press the first step of the sequencer, which will remove the red highlight, then press it again and it will be yellow. The yellow step means that it has a SUB step on it.
Alternatively, if you hold SUB and press a step, it will add the yellow SUB step quickly, without having to remove the regular step and then add the SUB step. If you continue to hold SUB and press the same step again, it will add a SUB step at half velocity, creating some dynamic range, displayed in dim yellow.
Now let’s add some more on a different SUB STEP. Press and hold SUB, and the display will show SUB STEP: followed by a fraction. 1/2 means it will split the step in 2, playing twice as many beats on the step. If you continue to hold SUB and turn the VALUE knob, you can change the SUB step to 1/3, 1/4, or FLAM. FLAM splits a step into 4, and plays the instrument on the first 2 of the 4, and displays as PURPLE on the step sequencer.
Let’s add a FLAM to a step by holding SUB and turning the VALUE knob until FLAM appears on the display. Then press a step until it is PURPLE.
If you hold SHIFT and press PTN SELECT, you will open the PTN SETTING menu. Use the VALUE knob and scroll to the right until you see Flam Spacing 1. Increasing the number increases the distance between the 2 notes of a FLAM for this pattern.
PRO TIP: You can quickly and easily add different sub steps to your pattern by holding SUB and changing the value using the VALUE knob, then pressing the desired step. Sweet!
Pattern settings
The TR-6S puts all the pattern settings in one place. Hold SHIFT and press PTN SELECT (SETTING) and the display will show PTN SETTING. From here, you can edit, you guessed it, the pattern settings.
The first setting is Sw ON, which means switching patterns also switches to the KIT specified by the next PTN SETTING: KIT Number. If you change to Sw OFF, switching patterns does not switch the kit.
PTN SETTING: KIT Number is the KIT that this pattern uses when PTN SETTING: KIT Sw is ON.
Tempo is this patterns TEMPO.
Scale is the scale of the step sequencer over 1 VARIATION. Notice that the white step sequencer pads change place when you change the scale while in TR-REC mode?
8th(T) is 8th note triplets, 16th(T) is 16th note triplets, 16th is 16th notes, 32nd is 32nd notes. This can give you a lot of flexibility by providing a different feel for your pattern in the triplet scale, and switching to 32nd notes gives you more notes to work with! Nifty!
This menu also contains Shuffle amount, Flam Spacing, ScatterType and Scatter Depth. ScatterType provides you with even more fun and freedom for the SCATTER effect as discussed earlier.
PTN SETTING:NAME… Rename your pattern here!
Changing colours for quick referencing
Categorising instrument channels into different colours allows you to quickly reference sounds when changing a pattern, great for when you haven’t used a pattern for a while.
To change the colour of our instrument channels, hold SHIFT and press KIT, then hold SHIFT and turn the VALUE knob until KIT:COLOR is shown on the display. Press the channel that you would like to change, press the VALUE knob, and turn it to change the colour of the channel. Neat!

PRO TIP: decide on a colour scheme for the different elements of your patterns and get into a habit of changing the colours as you develop your beats. It will come in handy later for quick referencing if you have a universal colour scheme.
Locking your pattern and nudging
Press UTILITY, then scroll to the right using the VALUE knob to find Ptn Lock.
With Ptn Lock OFF, any changes that are made to a pattern will remain if you change to a different pattern.
With Ptn Lock ON, any changes to a pattern will be void when you change to a different pattern.
This is useful to keep patterns in a state that we like them, especially if you’re like me and enjoy jammin’ out and getting weird on some sweet, home-made patterns!
To nudge your pattern one step forward or backwards while your pattern is playing, hold SHIFT and press either COPY and NUDGE -, or UTILITY and NUDGE +.
PRO TIP: NUDGE is useful if you are mixing with another device, or a DJ in a live setting.
See more of the TR-6S here: https://www.roland.com/au/products/tr-6s/
Read on to the fourth and final instalment of the Ultimate Guide here: https://rolandcorp.com.au/blog/tr-6s-ultimate-guide-settings
Looking for more information? Check out the video manual below
Contributed by Joel Tullemans
https://www.sirpants.com/