Welcome to the second instalment of the Ultimate Guide to the TR-6S Effects. If you’ve been following the steps in the previous guide, you will have a bangin’ beat filled with your favourite drum sounds and some groove to humanise it. If you’re already comfortable programming a basic beat, read on to learn about effects!
To brush up on the basics, check out the first instalment of the ultimate guide to the TR-6S here: https://rolandcorp.com.au/blog/tr-6s-ultimate-guide-basics
Table of Contents
Add reverb to your beat
Let’s get started with Reverb. To add the default reverb to your pattern, press MASTER FX, then turn the TUNE (reverb) knob.
Note: some KITs and INSTs already have reverb and delay applied to them, so if you don’t hear a change to your pattern right away, keep reading!
Wait a minute, you said we were going deep into the menus?? Okay, if you insist, this might take a while…
Each track on the TR-6S has an independent reverb “send”, meaning that each instrument can have a different amount of reverb applied to it. Some instruments and kits will have tracks sent to the reverb at different amounts, which we will discover in the INST menu.
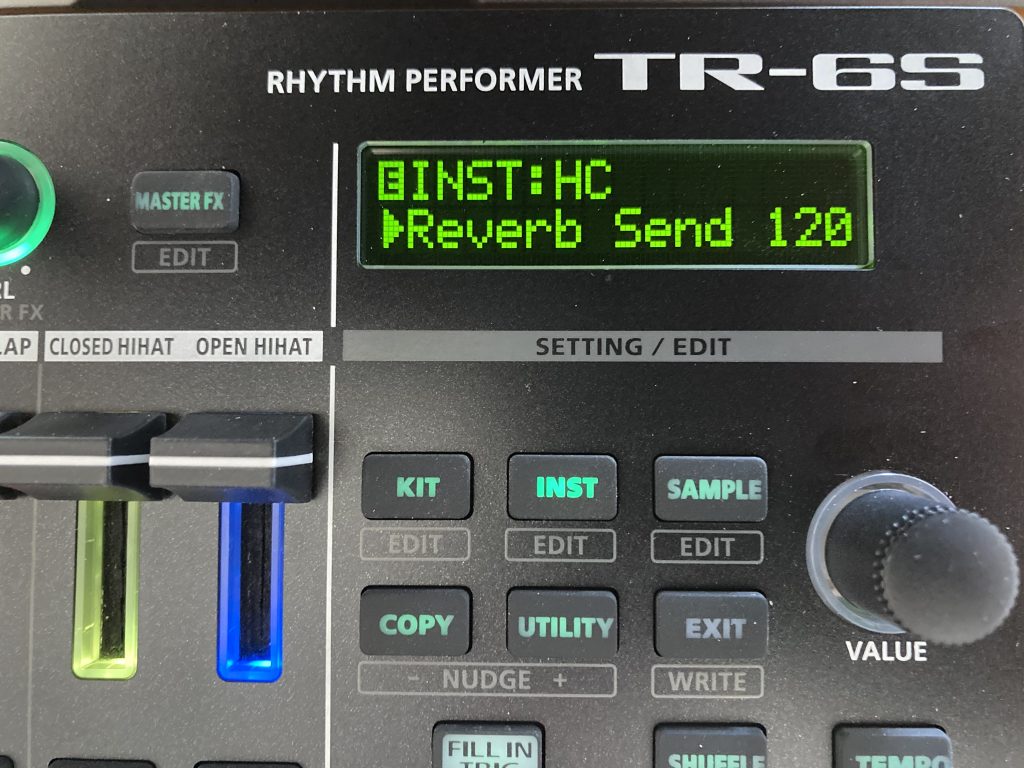
To change these parameters, select an instrument, let’s add more reverb to the HC instrument channel, so press HC. Hold SHIFT and press INST, to bring up the editor for the hand clap. Turn the VALUE knob to the right and check the display for “Reverb Send”. Press the VALUE knob once and turn it to change the setting. The amount ranges from 0 to 255. For this example, let’s turn it to a setting above 200 for dramatic effect and education purposes.

Keep in mind that moderation is key when adding reverb (and most other effects!). Adding it to every channel can quickly sound messy, especially on bass and kick drum channels. Experiment with adjusting the reverb send on each track to find a sound you like.
PRO TIP: Once you have located Reverb Send in the menu for an instrument channel, press a different channel to quickly edit its independent Reverb Send.
Also in the INST edit menu are many other settings for each instrument channel, such as fine-tuning the TUNE, DECAY, CTRL, pan, reverb send, delay send, LFO type, LFO depth, FX type, EQ and gain of each instrument channel. Pretty neat, huh?
Reverb controls
Okay so we’ve talked about how to send each track to the reverb, but how do we edit the reverb itself? Good question! Hold SHIFT and press KIT to bring up the master controls on the LCD screen. Then turn the VALUE knob until KIT:REVERB is displayed. Below is a quick overview of what each parameter does, remember to hit VALUE to confirm your selection for each parameter before moving on to the next.
- Reverb Type allows you to choose between AMBI, ROOM, HALL1, HALL2, PLATE, and MOD, all of which have their own characteristics. Let’s select PLATE for now.
- Reverb Length changes the length of the reverb. Think of this as changing the size of the room you’re in. Let’s go with 90 for now. Once you’re satisfied, press VALUE to confirm.
- Level: Pretty self-explanatory, let’s set it to 255 so we can really hear what it’s doing.
- Pre-Delay determines the amount of time between the dry sound and the reverb. Let’s leave it at 20ms for now.
- LowCut removes frequencies from the reverb below a chosen frequency. This is useful to remove the muddiness that reverb can add to low-frequency instruments.
- HighCut removes frequencies above a chosen frequency.
- Density: As you can imagine, controls the density of the reverb. 10 is a nice, thick reverb, whereas 0 is a very thin sound, however no less desirable depending on your taste or the context!
There you have it… reverb. I told you it would take a while!
Using delays for syncopated effects
Okay, still with me? Now, without any further delay…
Adding delay to your sounds is a great way to add texture, depth, and interest to your pattern. First, press MASTER FX to highlight it green, then turn the DECAY (DELAY) knob to a desired position. Keep in mind that your sounds may already have delay attached, so bear with me!
Press HC to highlight it green, hold SHIFT and press INST, and turn the VALUE knob until you see Delay Send on your display. Press the VALUE knob and turn it to adjust the amount of delay on the chosen track. As before, turn it to a setting above 200 for dramatic effect.
PRO TIP: Just like with the reverb, once you have located Delay Send in the menu for an instrument channel, select a different channel to quickly edit its independent Delay Send.
Delay controls
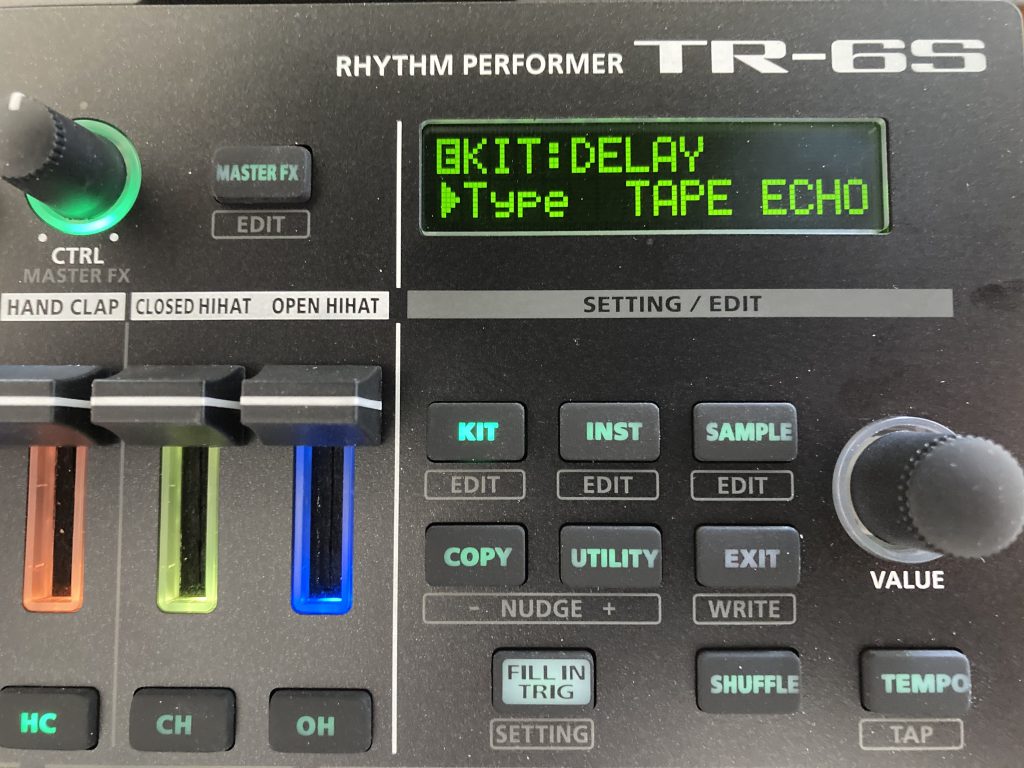
Now, let’s change the delay settings by holding SHIFT and pressing KIT, then hold SHIFT and turn the VALUE knob until the display says KIT:DELAY. As with our friend the reverb, we can customise the delay with the powerful TR-6S effects engine. Remember to confirm your selection for each parameter by pressing VALUE.

- Type: The are 3 delay types built into the TR-6S.
DLY is a digital delay.
PAN pans the delay between the left and right, also known as ping-pong delay.
TAPE ECHO emulates old tape-delays (duh!) for some interesting vintage tones! - TempoSync will sync the delay to the tempo of the TR-6S.
With this setting OFF, you can adjust the amount of time between each delay, but for now, let’s set it to ON. - Level is the volume of the delay, let’s set it to full for now (255) for demonstration purposes.
- Time is a fractional value to the right of the display represents the type of note, or subdivision of the delay.
For example, 1/8 will repeat on every 8th note in the bar.
1/8D is a dotted 8th note (1.5 times the length of an 8th note).
1/8T is a triplet 8th note.
Don’t worry if this mumbo-jumbo doesn’t make sense to you, just listen and see what sounds cool. - Feedback controls how long the delay continues before it fades to silence.
Around 50 or so should be good for this demonstration. - HighCut removes frequencies above a chosen frequency.
This can put the delay to the back of the mix, allowing other elements of your pattern to shine through.
The next 4 parameters only apply to the DLY and PAN type.
- H DampF allows you to lower the volume of the frequencies above the H DampF point.
- L DampF allows you to lower the volume of frequencies below the L DampF point.
- Tap Time applies to the PAN delay only, changing this setting syncopates the delay. Play around with it until it sounds cool!
The TAPE ECHO delay type has several unique parameters.
- MODE: S is for short, M for medium and L for long, then combinations of 2 or 3 of them. This can get pretty intense but keep reading!
- EQ: You can edit the amount of Bass and Treble of the delay, making it brighter or duller (yet no less boring!), as well as the panning of the S, M, & L delays. This can create some very fun and interesting rhythms, just remember to use your ears!
- Tape Dist adds a mild distortion to the delay.
- W/F Rate and W/F Depth allow us to introduce pitch variance into our TAPE ECHO. W/F Depth is the amount of variation, and W/F Rate is the rate of the pitch changes. The effect is subtle, but emulates old, analogue tape delays. Very psychedelic, baby!
- Reverb Send applies to all delay types, determining how much of the delayed sound is sent to the reverb, in the same manner as our instruments.
Phew, we got there! That was a lot to take in, but just dive into the menus and have some fun!
PRO TIP: as mentioned earlier, delay and reverb on the bass drum can get messy. I recommend delay & reverb on the snare, clap, and hats, but there are no rules! Experiment to your heart’s content.
Master Effects
So we’ve touched on reverb and delay, but there is also a MASTER FX that can be added to the whole pattern. The MASTER FX (CTRL knob) differs from the reverb and delay as it is only active while the MASTER FX button is highlighted. There are a lot of different MASTER FX, so without further ado…
Press MASTER FX and turn the CTRL (MASTER FX) knob up. This will add the chosen effect to the mix, which should default to LPF/HPF (definitions below). The display will show the amount of effect applied.

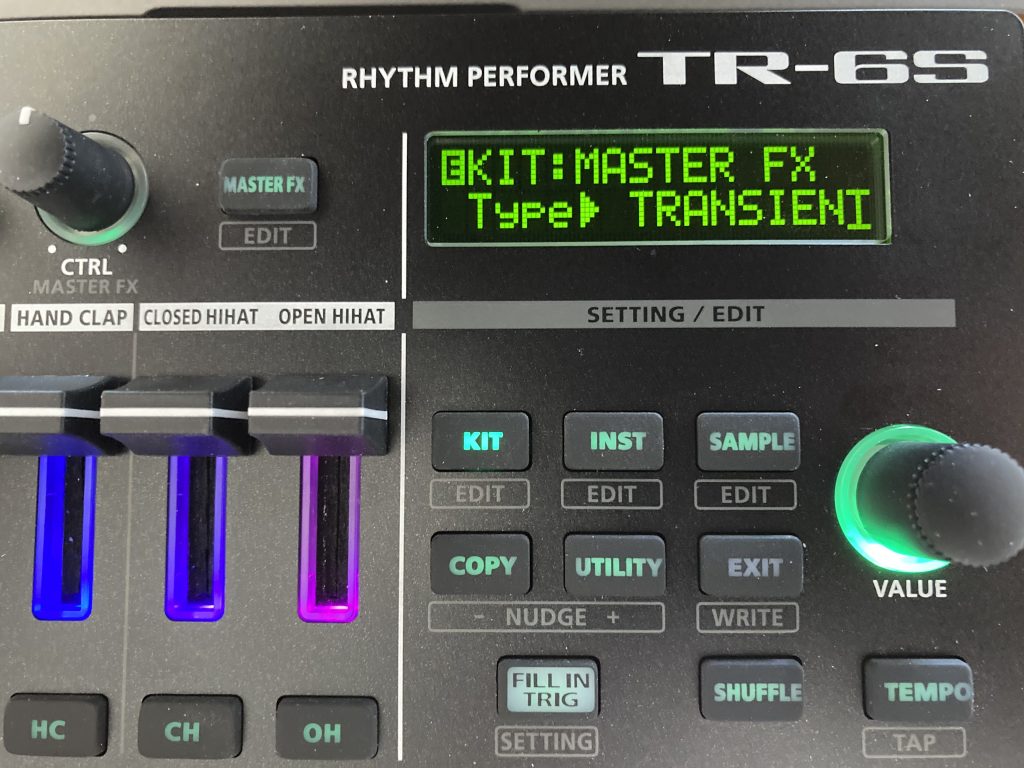
By holding SHIFT and pressing MASTER FX, you can then change the effect Type, there are many to choose from.
Here is a list of the effects with the names and a brief description:
- HPF – High Pass filter – removes low frequencies.
- LPF – Low Pass Filter – removes high frequencies.
- LPF/HPF – the 12 o’clock setting is neutral. Above that is a HPF and below that is a LPF. Standard DJ FX stuff.
- H BOOST – High frequency boost.
- L BOOST – Low frequency boost.
- L/H BOOST – 12 o’clock is neutral. Above that is H BOOST, below is L BOOST.
- ISOLATOR – essentially an equaliser – used to remove certain parts of the frequency spectrum, great for shaping the sound and adding colour.
- TRANSIENT – used to add another dimension to your mix, it allows you to position things in the front or back of a mix without juggling levels.
- TRANSIENT2 – a variation of above.
- COMPRESSOR – brings all the sounds together and makes them phat.
- DRIVE – adds drive to the mix, making it dirtier and adding frequency content.
- OVERDRIVE – adds overdrive to the mix – great for transitioning between patterns or adding grit.
- DISTORTION – adds distortion to the mix – dirtier than overdrive.
- FUZZ – adds fuzz to the mix – seriously dirty.
- CRUSHER – crushes your mix to bits! Yes, it’s a bit crusher.
- PHASER – set phasers to stun.
- FLANGER – just try it.
- SBF – your mix is about to get weird.
- NOISE – adds white noise for those builds and drops.
Mapping the CTRL knob
You can change what the CTRL knob does when the MASTER FX button is highlighted. To do this, use the CTRL knob while MASTER FX is highlighted green, scroll to the right using the VALUE knob, and you will see Ctrl on the display. Each effect has its own parameters, so play around and see what you can come up with!
PRO TIP: Depth means the extent of the effect. If Ctrl Depth is displayed, that means that the CTRL knob will essentially control how much of the effect is applied.
WARNING: This can get really crazy, really quickly, and sometimes the volume can get loud unexpectedly (like when changing the resonance of an effect).
You’ve been warned.
Interchangeable instrument FX (CTRL knob)
Each instrument on the TR-6S can be changed using TUNE, DECAY and other interchangeable effects controlled by the CTRL knob. To change the effect, hold SHIFT and press KIT. Hold SHIFT again and turn the VALUE knob until you see KIT:CTRL displayed on the LCD screen. You can designate a universal effect for all instruments by selecting Sel, then turning the VALUE knob to a parameter you would like shared among all instruments. For this example, let’s select User, meaning that each instrument channel can have its own effect that we determine.
With User selected, scroll to the right to find the instrument you would like to edit. Alternatively, select an instrument channel to edit it. Press VALUE to change what the CTRL knob does for that instrument. Different types of instruments have different parameters available to set for the CTRL knob, so play around with them and see what’s available. Don’t forget to turn the CTRL knob once you have selected an effect to hear what it does!
PRO TIP: When an effect is applied using the CTRL knob, if you change the effect associated with the CTRL knob, the previous effect will still be applied. So, make sure that you turn the CTRL knob back to 0 before changing an effect, or press EXIT a few times to return your display to the “home” screen, then turn the CTRL knob to 0. Then simply hold SHIFT and press KIT to return to where you were in the menu 🙂
Create space in the mix with panning
Mixes can get crowded very quickly and panning can give elements room to breathe. Panning your tracks sends them to the left or right speaker, by an amount of your choice.
To pan a track, select the instrument you would like to pan, in this case let’s continue to use the SD. Press SD, then hold SHIFT and press INST, bringing up the instrument menu on the display. Using the VALUE knob, scroll to Pan. Press VALUE, then turn the knob left or right, sending the instrument to the left or right respectively.
A general rule of thumb is to keep the kick drum (BD) in the centre, as well as a primary bass element or sound, and pan everything else at least a little bit. Hard panning is especially effective for psychedelic sounds, or if you have 2 similar elements playing simultaneously, place one on the left and one on the right. Boom, stereo.
For example, imagine a rock band with a drummer, a bassist, 2 guitarists, and a singer. The kick is in the middle with the bass guitar and vocalist, and everything else is slightly panned. This includes the rest of the drum kit and the 2 guitars, one of which would be panned a fair way to the left, and the other would complement it on the right. This is not a rule, just advice!
PRO TIP: If you use the previous step to change the CTRL knob to universally control PAN, then you can quickly PAN all your instrument channels. Then proceed to designate effects for the CTRL knob on the individual channels.
Adding motion to your patterns
Now that your pattern is developed, effected, and straight-up fire, let’s add some motion to it. Motion adds human feel and evolution to an otherwise repetitive pattern. It captures changes made to the instrument through TONE, DECAY, CTRL, REVERB, DELAY, and MASTER FX.
I find that this is particularly noticeable and well-received on a hi-hat pattern. Let’s start by selecting your CH channel, assuming you have left it as a closed-hat sound. If not, select an instrument channel that you would like to give some extra feel to.
Press TR-REC and add a step on all 16 steps to make all the sequencer pads red. This might sound wild at first (or awesome!!).
Turn the DECAY knob up and down and take note of the difference it makes. When you press INST REC, any changes that you make to the knobs will be recorded while the pattern is playing. Let’s record some motion for the DECAY parameter, simply by turning it while the pattern is playing, and INST REC is highlighted red.
At first, you won’t hear this motion being recorded, but you can hear it by holding SHIFT and pressing VARIATION (MOTION) and turning the VALUE knob so that the display shows MOTION: ON.
If you don’t like the DECAY motion that you’ve recorded, hold SHIFT+VARIATION together and turn the DECAY knob, the display will show DECAY ERASED. If you hold SHIFT+VARIATION and turn the TUNE knob, the display will show TUNE ERASED, etc.
Fine-tune your motion
To fine-tune the motion step-by-step, press TR-REC then hold the step that you would like to change. This will change the display to read “XX:STEP Y”, where XX = the instrument channel you have selected, and Y = the step number (remember, there are 16 steps in total).
The buttons COPY and/or UTILITY will begin to flash. Press either COPY or UTILITY (whichever is flashing) to select the parameter that you would like to edit on that step, in this case, we want DECAY. Then you can turn the VALUE knob to change the setting for that step.
Keep in mind that all recorded motion will trigger on yellow pads. Meaning if a step has a motion recorded for the selected parameter, it will be highlighted yellow while holding down one of the steps. If the step is grey, then it will assume the value of the first yellow step to the left of it. Pressing and holding a step in TR-REC mode, then pressing CLEAR will clear the selected parameter change on that step.
To erase ALL the motion for a pattern, press and hold SHIFT+VARIATION together, which will display ERASE MOTION: ALL on the display, then press VALUE to confirm.
Alternatively, press and hold SHIFT+VARIATION and turn the VALUE knob, to clear an individual parameter by name, which is incredibly useful! The TR-6S just gets better and better.
Or you could hold SHIFT+VARIATION and press one of the 16 step sequencer pads to clear the MOTION for the corresponding instrument or variation, as written below the pad.
Fills and scatter
So, you’ve been developing this pattern for a while now, it sounded dope at first, but now it’s a little stale. It’s time to learn about FILLS and SCATTER!
A quick and easy way to add some life to your pattern, while your pattern is playing just press FILL IN TRIG. Kinda cool, huh?
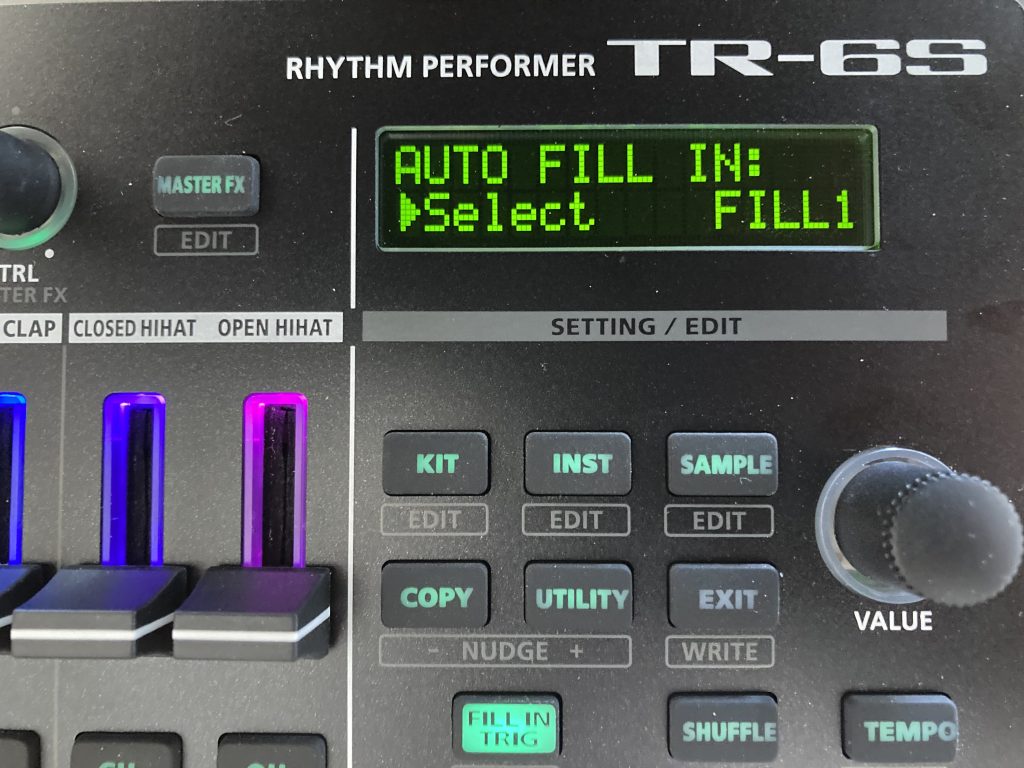
To change what the FILL IN TRIG button does, access it’s settings by holding SHIFT and pressing FILL IN TRIG. Press VALUE, then cycle through FILL1, FILL2 and SCATTER.
FILL 1 and 2 are preset drum fills and SCATTER is a glitchy effect. Play around with them to find one you like!
Now let’s make it add a fill every 4 bars. Hold SHIFT and press FILL IN TRIG, turn Sw to ON, then scroll to the right so the display shows Cycle 4. Now every 4 bars it will apply the SCATTER effect. Cool! Of course, you could change the Cycle to another number, applying the scatter effect to every 2/4/8/12/16/32 bar if you choose.
Another cheeky SCATTER feature is tucked away in the PTN SETTING menu, which can be accessed by holding SHIFT and pressing PTN SELECT. From there, scroll to the right using the VALUE knob to find ScatterType, with a value from 1-10. This will give you more fun, freedom, and flexibility for all your SCATTER needs, wants, and desires. More on the PTN SETTINGS menu in the next instalment of the Ultimate Guide to the TR-6S.

There we have it, an overview of the world of TR-6S effects! Read the next instalment of the TR-6S Ultimate Guide to learn about programming pattern variations and fills!
Check out the TR-6S here: https://www.roland.com/au/products/tr-6s/
Check out the next instalment of the Ultimate Guide here: https://rolandcorp.com.au/blog/tr-6s-ultimate-guide-advanced-patterns
Looking for more information? Check out the video manual below
Contributed by Joel Tullemans
https://www.sirpants.com/
