Recording the Roland TD-07 is easy!
Here’s how to record MIDI and audio with one of the world’s most popular drum kits.
Acoustic drum recording is an art form.
Finding a balance between equipment, knowledge, patience, and money that works for your project is a skill that comes with experience and time.
Being a collection of various percussion instruments, a drum kit requires different types of microphones and positioning to make one cohesive drum kit sound.
Contributed by Simon Ayton for Roland Corporation Australia
ENTER ELECTRONIC DRUMS…
Recording electronic drums are simple when compared to recording acoustic drums.
You can record almost anywhere, the kit will fit quickly into a recording space and with unlimited sound and performance possibilities, your options for creativity are increased dramatically.
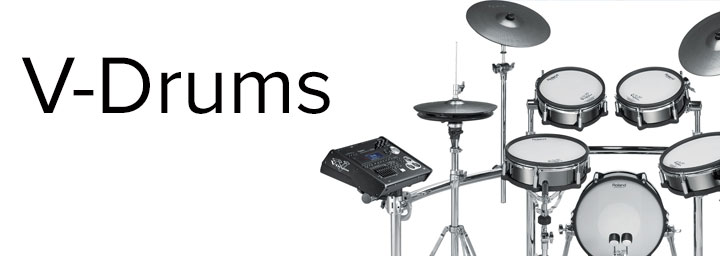
See the Roland V-Drums Range Explained Here
When recording the Roland TD-07 you can forget about tuning, muffling, microphone positioning, and expensive preamplifiers.
Specially designed studios, noise problems, and studio hire fees are things of the past too allowing you to relax, focus on the music, and just play.
V-Drums are ideal for recording yourself, because their simplicity means you can focus on your actual performance.
When recording the Roland TD-07KV, capture the performance first, choose sounds later.
Here’s How.
RECORDING THE TD-07
The TD-07KV V-Drums could be just the thing for you if you’re pushed for space or just starting out with the drums.
As the ultimate portable drum kit, the TD-07 can be ready to record in seconds.
Even for a beginner with no previous experience, the TD-07 is simple to set up and operate.
Whether it’s a computer or iOS device, the TD-07 module features a MAC and PC compatible USB port for connection.
This single connection makes audio and MIDI recording a breeze.
Audio recording is about capturing the actual sound, either at the same time as the notes or once the MIDI performance has been edited to perfection.
Use MIDI recording to capture the actual notes of the performance.
Here’s how to record MIDI from the TD-07KV using the USB port.
See the TD-07 manual here for detailed info

No special drivers are required to record the note performance data of the Roland TD-07 via PC/MAC/Chromebook.
Simply connect the TD-07 module to the computer via a standard USB cable and choose the TD-07 as the MIDI input in the music software

RECORDING THE MIDI NOTES OF THE TD-07
Follow these steps if you want to record and edit the actual notes of your performance.
- Connect the TD-07 via a standard USB lead to your MAC or PC.
- Enable the TD-07 as both a MIDI input and output port in the recording software settings
- Create a MIDI track in your music software and choose the TD-07 as the MIDI output port; often referred to as an external MIDI instrument
- Change the local midi control of the TD-07 to OFF to eliminate a feedback loop (SETUP | MIDI | Local Ctrl ‘OFF’)
- Select the TD-07 as the input in the software MIDI track.
- Arm RECORD and capture some playing.
- Playback the MIDI that will play your MIDI performance back out to the TD-07 to generate the drum sounds.
- You can Switch kits on the module to try out different kit sounds as the performance plays back
What is MIDI? See the simple explanation of MIDI Vs. Audio here
RECORDING THE AUDIO SOUND OF THE TD-07
You don’t need an audio interface to record the audio of the TD-07. Its built-in USB allows MIDI & Audio to be streamed simultaneously and captured on separate tracks for complete control.
This means your backing track and music your are playing to will stream directly to your TD-07 so connect your headphones to the TD-07 module.
The first step is to download and install the vendor driver for the kit on your MAC or PC.
Get the Audio/Midi driver for the TD-07 here
- Change the USB mode of the TD-07 module to VENDOR in SETUP | SYSTEM | USBDrv | VENDOR then restart the module
- Connect the TD-07 via a standard USB lead to your MAC or PC.
- Select the TD-07 as the audio input and audio output in the software audio settings.
- Create a stereo audio track in your music software
- Choose the TD-07 as both the input and output for the track onto which you are recording
- Arm RECORD and capture some playing.
- Playback the audio recording which you will hear through the TD-07 combination phones and line output
RECORDING THE AUDIO SOUND and MIDI NOTES SIMULTANEOUSLY
For the ultimate control, it’s easy to capture both the performance notes and the audio of the TD-07 at the same time.
This is the way the professionals work and gives the most options later.
As the audio being captured is exactly what the player was hearing at the kit, it’s also gives a great reference for the performance and the sound further down the line and you can even use both.
- As per the recording audio section, confirm the drivers are installed for your operating system and the module is switched to ‘VENDOR’ mode to allow MIDI and Audio to be streamed via USB
- Connect the TD-07 via a standard USB lead to your MAC or PC.
- Create a stereo audio track in your music software
- Select the TD-07 as the audio input and audio output in the software audio settings.
- Enable the TD-07 as both a MIDI input and output port in the recording software settings
- Create a MIDI track in your music software and choose the TD-07 as the MIDI output port; often referred to as an external MIDI instrument
- Change the local midi control of the TD-07 to OFF to eliminate a feedback loop (SETUP | MIDI | Local Ctrl OFF)
- Arm RECORD of both the audio and MIDI tracks and capture some playing.
- Playback the audio recording and MIDI which you will hear through the TD-02 combination phones and line output. If the sound is weird that’s because the same sound is playing twice causing a phasing effect. Mute one of the tracks to hear just one. You can also change the selected drum kit in the TD-07 module to create a layered sound of the MIDI instrument and audio at the same time for an impressive drum sound.
OTHER THINGS YOU CAN DO WITH THE TD-07 KIT
Now that you have the connections made to your MAC or PC, you can try some of these other possibilities.
![]()
Connect to an iOS device
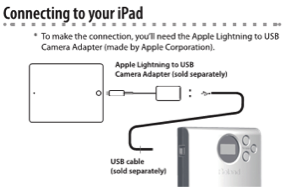
To Interact with any of the MIDI Apps like Garageband directly from the TD-07, use the separately available Apple Camera Connection Kit.
Additionally, by pairing your TD-07 with your mobile device via Bluetooth, you can also transmit MIDI/Audio bi-directionally for wireless communication of notes and audio data.
See the details in the manual here
![]()
Notate your drum parts
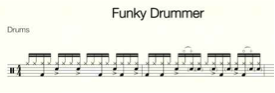
Save your MIDI recordings as SMF (Standard MIDI Files) and load them into music notation software to see the drum score.
![]()
Armed with this basic information and a TD-07 V-Drums kit, you’re ready to take the first step towards recording great sounding drums. Record yourself without ever leaving home and if you do, who knows where it will lead?
Related Articles
V-DRUMS RANGE OVERVIEW
TYPICAL DRUM PLAYING TECHNIQUES WITH V-DRUMS
Related Products