BOSS Loop Stations are famous for their industry leading flexibility right out of the box. They also provide a serious level of functionality for the beginner or intermediate looping musician.
However, for the advanced user who wants to fully extend their looping creativity, a higher degree of control is often required. Foe example, whether or not to enable precise loop operation, control multiple operations simultaneously or to even synchronise multiple Loop Stations.
All BOSS Loop Stations allow the user to expand the control they have over their machine’s powerful internal functionality. Every single Loop Station in the BOSS lineup enables a user to add external footswitches. This provides simple and swift access to common functions. More in-depth loopers, such as the RC-300, RC-202 and RC-505, offer an incredible array of controllable functions. This is done via their Control Assignment functionality. In addition to this, external MIDI control provides the further ability to take complete control of these Assignments.
In this article, we’ll run you through the basic concepts behind the vast expansion capabilities of BOSS Loop Stations. We will also demystifying the sometimes confusing world of MIDI control.
Contributed by Matt Walsham for the Roland Australia Blog
Adding a footswitch to your loop setup (All Loop Stations)
There is a LOT of functionality packed into every BOSS Loop Station. As a result, it’s difficult for the designers to cram complete control onto a limited number of on-board footswitches. Generally, this means that you need to access key functions through a combination of actions. This includes tapping, double-tapping or holding the Loop Station’s footswitches to access various core functions.
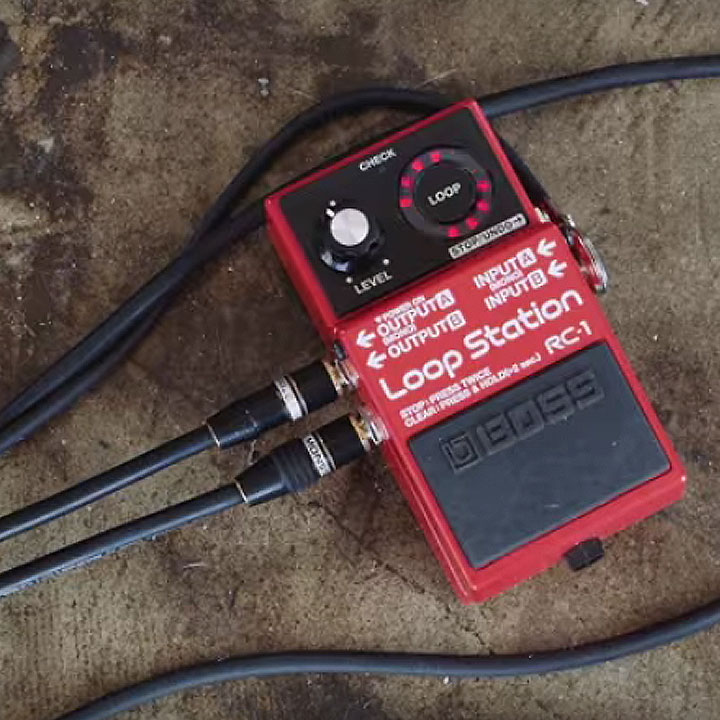
On an RC-1 for example, there are 4 functions assigned to the single stomp switch of the unit.

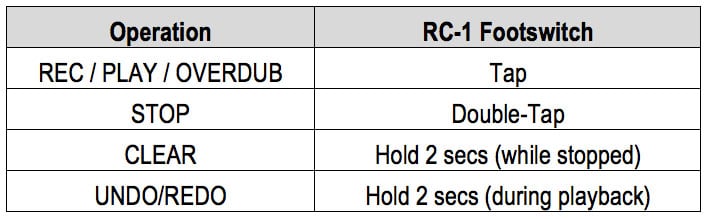
Double-tapping or holding the footswitch can often be a tricky manoeuvre during performance. It can also be difficult to time with complete precision.
However, by adding an external 2-button footswitch (e.g. FS-6) to the setup, connected with a single TRS (Stereo) jack cable, the following functionality is available:
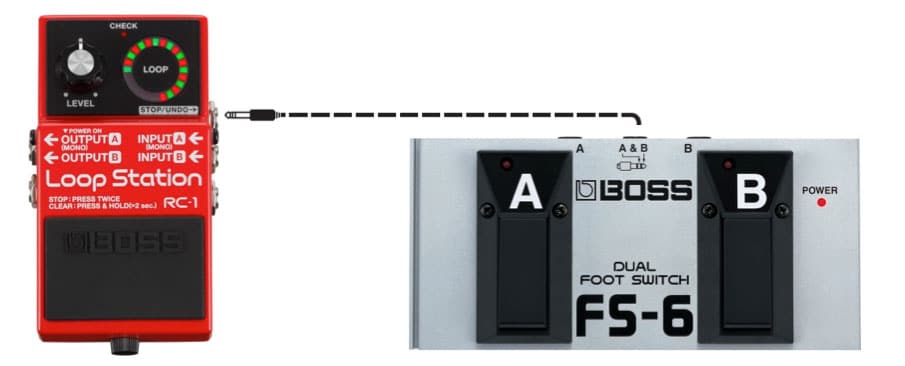
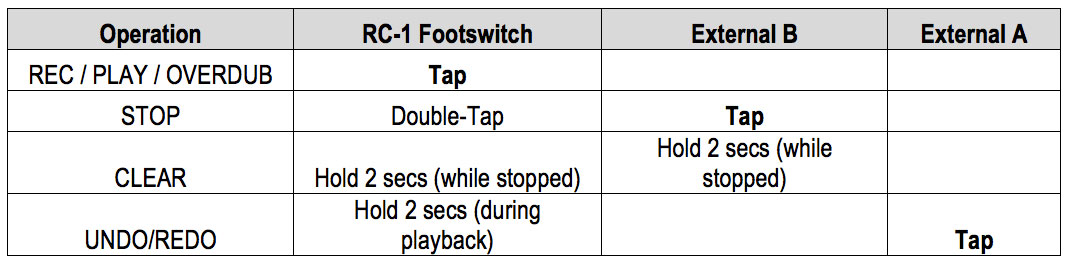
Now, the time-critical function of STOPPING loop playback can be accomplished with a single tap. This enables a much finer and more musical control of the stop point.
Similarly, using the UNDO/REDO function can accurately enhance performance dynamics. This is achieved by adding or subtracting overdub layers, all with the timing precision of a single tap.
All BOSS Loop Stations offer the capacity to add up to two extra footswitches. For example, the addition of either one or two FS-5U footswitches, or a single 2-button FS-6 or FS-7 footswitch. The RC-300 doubles this capacity, by supporting up to 4 additional footswitch buttons.
(See APPENDIX A for a full list of External Footswitch controls by order of Loop Station).
Expanding foot control with external footswitches is simple, powerful and relatively inexpensive. We recommend it to any Loop Station owner as the first step towards taking control of their looping rig.
Control Assignments (RC-300 / RC-202 / RC-505)
An important note for any advanced looper who wishes to expand their looping creativity! The RC-300, RC-202 and RC-505 Loop Stations offer the ability to completely customise the behaviour of their Loop Station via CONTROL ASSIGNMENTS.
ASSIGNMENTS are a set of instructions, programmed by the user, which tell the Loop Station to perform particular functions.
![]()
Example:
On an RC-300, the user wishes the LOOP EFFECTS to be engaged on pressing the TRACK 2 PLAY footswitch.
This is achievable if the user programs an ASSIGNMENT, within the RC-300’s MEMORY EDIT menu.
To understand ASSIGNMENTS, we must understand the following terms:
- Assign Target: The parameter that the user wishes to activate/deactivate/alter. In the example above, the Assign Target is “LOOP FX ON/OFF”.
- Target Min: Sets the minimum possible value of the Assign Target parameter. In the example above, minimum value would be “OFF”.
- Target Max: Sets the maximum possible value of the Assign Target parameter. In the example above, maximum value would be “ON”.
- Source: Defines how the specified Target is to be controlled/triggered. In the example above, the Source is the TRACK 2 PLAY footswitch.
In other words, setting a Control Assignment is characterised by this logic statement:
Control Assignment:
“Specifying a Target parameter that will be controlled (within the operating range bounded by Target Min and Target Max), via a Source”.
![]()
Each of the three Loop Stations with Assignment functionality have a large number of Assign Targets that are controllable by various Sources. For specific details, please refer to the Owner’s Manual for each product. Support for multiple simultaneous programmable Assignments is available, allowing the user to enable considerable customisation. The RC-300 and RC-202 can support up to 8 Control Assignments per memory patch. The RC-505 (with Version 2.00 firmware) supports a massive 16 Assigns per memory patch.
On all 3 of these Loop Stations, any external footswitches (as discussed earlier), are selectable as Assignment Sources. This means that the user can re-purpose them to perform any Target function. It’s even possible to assign multiple Targets to a single Source. As a result, the single tap of a footswitch can achieve a variety of different functions.
Taking advantage of the control offered by Control Assignments does require some button pressing and menu-diving. However, the result is more than worth it as it allows you to perform advanced functions with your Loop Station. This will elevate your performance to the next level.
MIDI Control
For the Loop Station master who wishes to take complete control over every aspect of their entire setup, then understanding MIDI is a must.
MIDI is an acronym for “Musical Instrument Digital Interface”. Developed by Roland, it’s a control protocol technology that allows MIDI equipped devices to communicate with and control each other. MIDI is an indispensable tool that allows you to take total control of a rig. It also enables various pieces of equipment to work in sync with each other, .
In the context of looping, there are two particular functional aspects of MIDI that are extremely useful. These are MIDI CC (Control Change) and MIDI Clock Sync.
MIDI CC EXPLAINED
MIDI CC is an information transmission protocol that allows one piece of MIDI capable gear to act as a “remote control” for another. By sending MIDI CC “messages” over a MIDI cable, various parameters on one device are able to be controlled by another device.
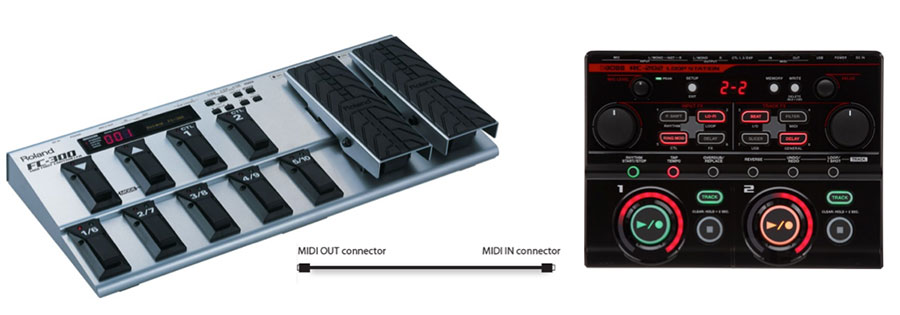
In the last section, we learnt about Control Assignments on the RC-300/RC-202/RC-505 and how useful they can be when paired with external footswitches used as Sources. Taking this concept a step further, the RC-300/RC-202/RC-505 Loop Stations are able to use MIDI CC messages as Assign Sources. This means that you can connect any MIDI controller (such as the Roland FC-300) to your Loop Station via a single MIDI cable. You can then Assign all of its footswitches / Expression Pedals to any of the Loop Station’s Target functions.
Via MIDI, footswitches are assignable to do things like switch tracks, apply effects, tap tempo and even control operation of multiple tracks simultaneously. Expression pedals are also assignable for control of useful functions. These include controlling track levels or effects parameters such as delay times. Using MIDI CC as an Assignment Source, the functionality of the Loop Station can be completely customised to the performer’s specific requirements.
MIDI SYNC CLOCK
Let’s now discuss MIDI Clock Sync. All MIDI equipped BOSS Loop Stations (RC-300/RC-202/RC-505) have the capability to transmit or receive tempo information via MIDI Clock. This means that performance tempo information is able to be shared and synchronised with other devices. These include samplers, DJ software, delay pedals or even other loopers.
This is useful in a variety of settings:
- Sync your Loops to DJ Software – Using MIDI Clock to sync your looper to DJ software enables you to add creative loops to existing tunes, while always remaining perfectly in time.
- Sync external delay units to your looper – Keep the tempo of your outboard delays in perfect sync with the exact tempo of your performance loop.
- Synchronised operation of 2 Loop Stations – By connecting two MIDI capable Loop Stations, they can be set up so that one device (Master) sends tempo information to the other (Slave). This means that 2 musicians in the same band can perform with perfectly synchronised loops.
MIDI Clock sync functionality can be used simultaneously with MIDI CC control (see previous section). This can be achieved using the same single MIDI cable. By combining these two concepts, you can take complete control of a slave looper’s functionality from a master looper. By doig this , it effectively doubles the amount of loop tracks and effects available for your use.
Take Control
As we have shown, the possibilities that manifest themselves once you take control of your looper are nearly endless.
If you’ve never used anything but your looper’s out-of-the-box functionality, then we wholeheartedly recommend that you try some of the suggestions in this article. We hope that you see your Loop Station with fresh eyes.
Unleash the massive power of your Loop Station and take complete control of your creativity!

Related Articles
THE ULTIMATE GUIDE TO BOSS LOOP STATIONS
TIPS AND TRICKS FOR ADVANCED LOOPERS
LOOK MA, NO FEET! HOW TO GET HANDS ON WITH YOUR LOOPER
DO YOU WANT KILLER BACKING TRACKS FOR YOUR LOOPER?
BOSS TALK: THE DEFINITIVE BEGINNER’S GUIDE TO LOOPING
Related Products